How to Set a Confidence Threshold for Object Detection

SUMMARY
Pick your confidence threshold from your model's precision-recall curve based on whether false positives or missed detections cost more, then confirm it on a golden set of annotated production images in Roboflow.
Your model's confidence threshold matters more than its mAP.
Most teams leave it at the default (usually 0.50) or nudge it until the demo image looks clean. But then production looks nothing like their eval.
Here's what the threshold is doing. Every prediction comes with a confidence score. Point a detector at a warehouse and you might get:
- Worker: 0.91
- Forklift: 0.72
- Box: 0.48
- Pallet: 0.31
At 0.30 you keep all four. At 0.50 the box and pallet vanish. At 0.75 you're left with the worker.
In short, go low and you keep more detections, some of them wrong. Go high and the weak ones drop, so false positives fall and misses rise. Which direction is right depends on what matters to you. In a warehouse, a false alarm costs someone a minute of review. A missed worker next to a moving forklift costs a lot more than that.
So your threshold is an error-cost decision, and it deserves data. In this post I'll show you how I set one for a warehouse model I trained on RF-DETR: pull the operating point off the precision-recall curve in Model Evaluation, race two or three candidates in a Workflow, prove the winner on a golden set, and add per-class overrides where one cutoff doesn't fit every class. I'll also cover the problems a threshold can't fix, like duplicate boxes and borderline calls, and what to do instead.
Choose an Operating Point From the Precision-Recall Curve
Precision and recall give you a useful starting point. Precision measures how often the detections you keep are correct. Recall measures how many of the real objects in the image the model finds.
A precision-recall curve shows how those two metrics change as the confidence threshold moves. Roboflow Model Evaluation includes a Production Metrics Explorer that plots precision, recall, and F1 across confidence thresholds. As you raise the confidence threshold, the curve shows where false positives decrease and missed detections begin to increase.
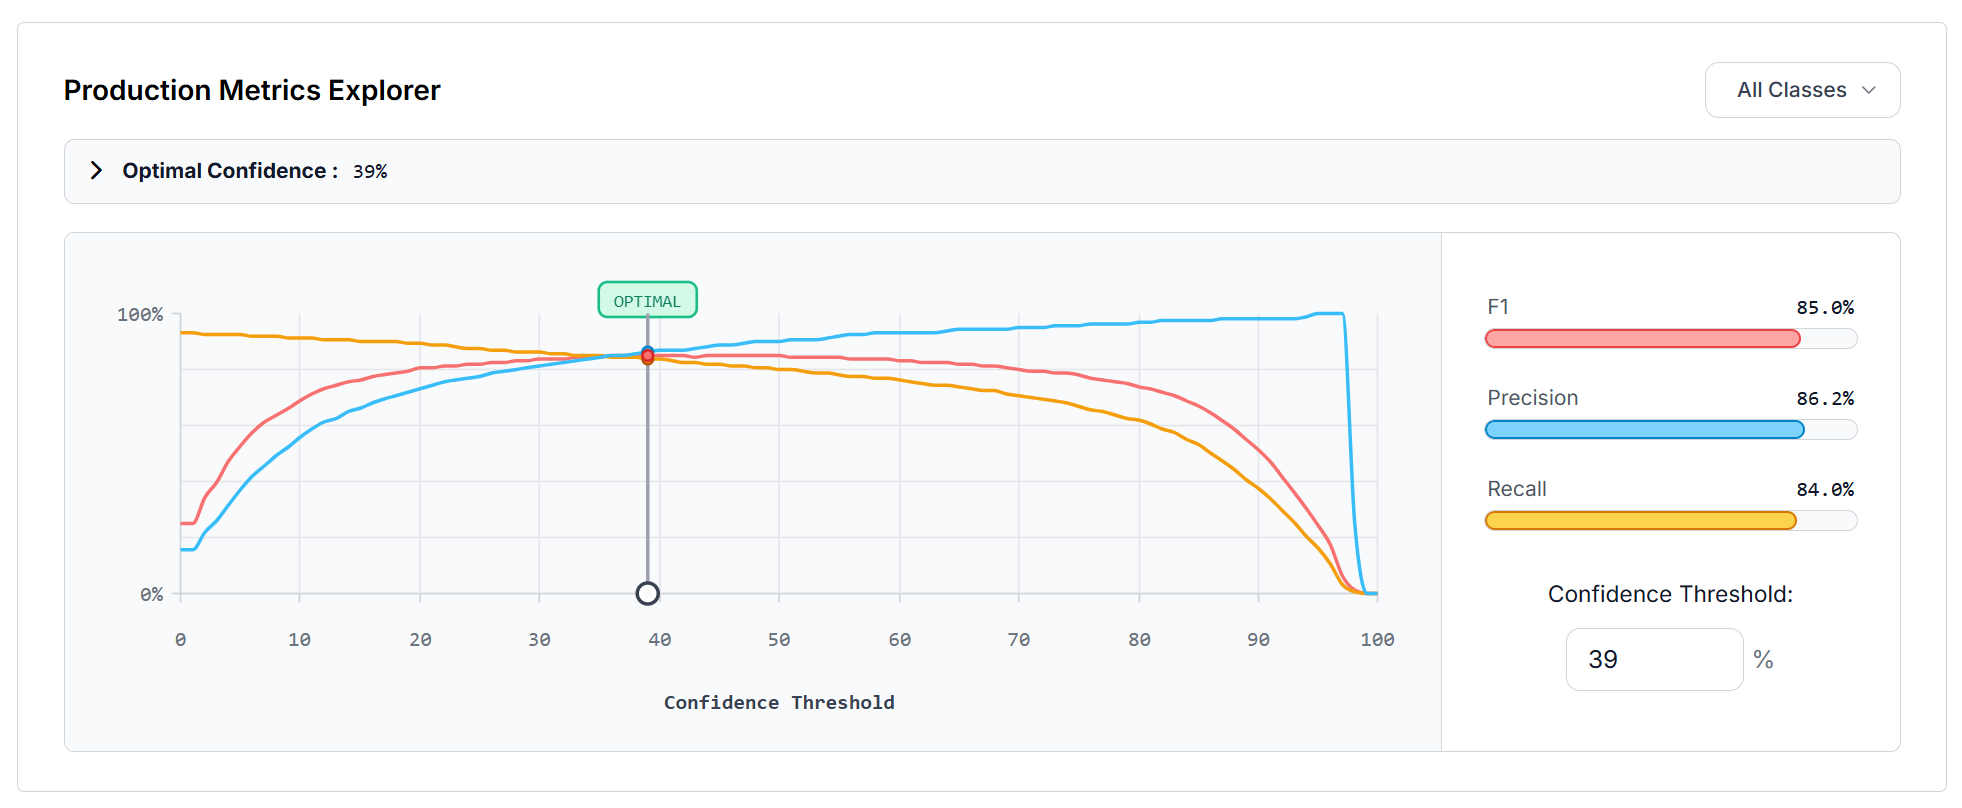
That is different from what mAP tells you. mAP summarizes detection performance across classes. Metrics such as mAP@50:95 also average results across several IoU thresholds, so mAP is useful for evaluating or comparing models. It does not tell you which confidence threshold to use in production. For that decision, look at the precision-recall curve and compare the thresholds you are considering.
Which point on the curve makes sense depends on the cost of the model's mistakes:
- Safety monitoring: missing a worker or hazard is a false negative. If that error carries the higher cost, you may accept more false positives and test thresholds that preserve higher recall.
- High-throughput inspection: false positives can reject good products or create unnecessary review. A higher threshold can reduce those errors, even if some difficult detections are missed.
Use the curve to identify a region that matches that error tolerance, then select two or three nearby thresholds for testing.
Test Candidate Confidence Thresholds in Roboflow Workflows
For the warehouse example, I trained an RF-DETR Small model to detect workers, forklifts, pallets, and boxes. I added the model to a simple Roboflow Workflow with an image input, bounding-box visualization, and label visualization.
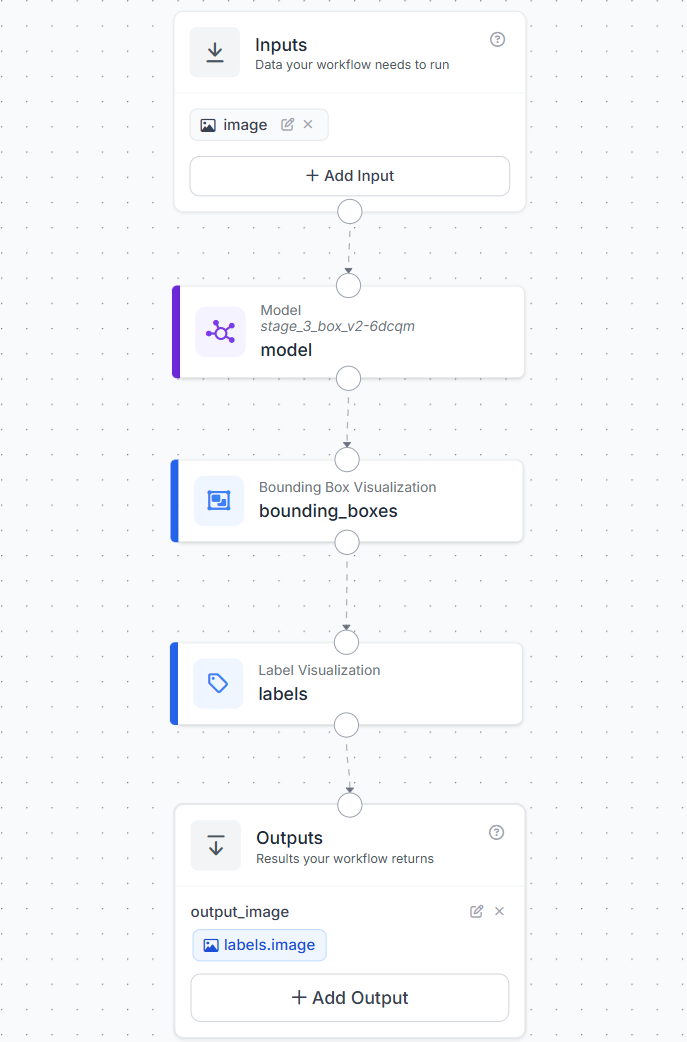
Using Model Evaluation, I identified 0.39 as the suggested operating point, then I tested that value alongside 0.30 and 0.50 using the same warehouse image. The image, model, and other Workflow settings stayed unchanged between runs, so the confidence threshold was the only configuration changed.
The test image contains 78 annotated objects in the ground truth: 54 boxes, 23 pallets, and 1 forklift.
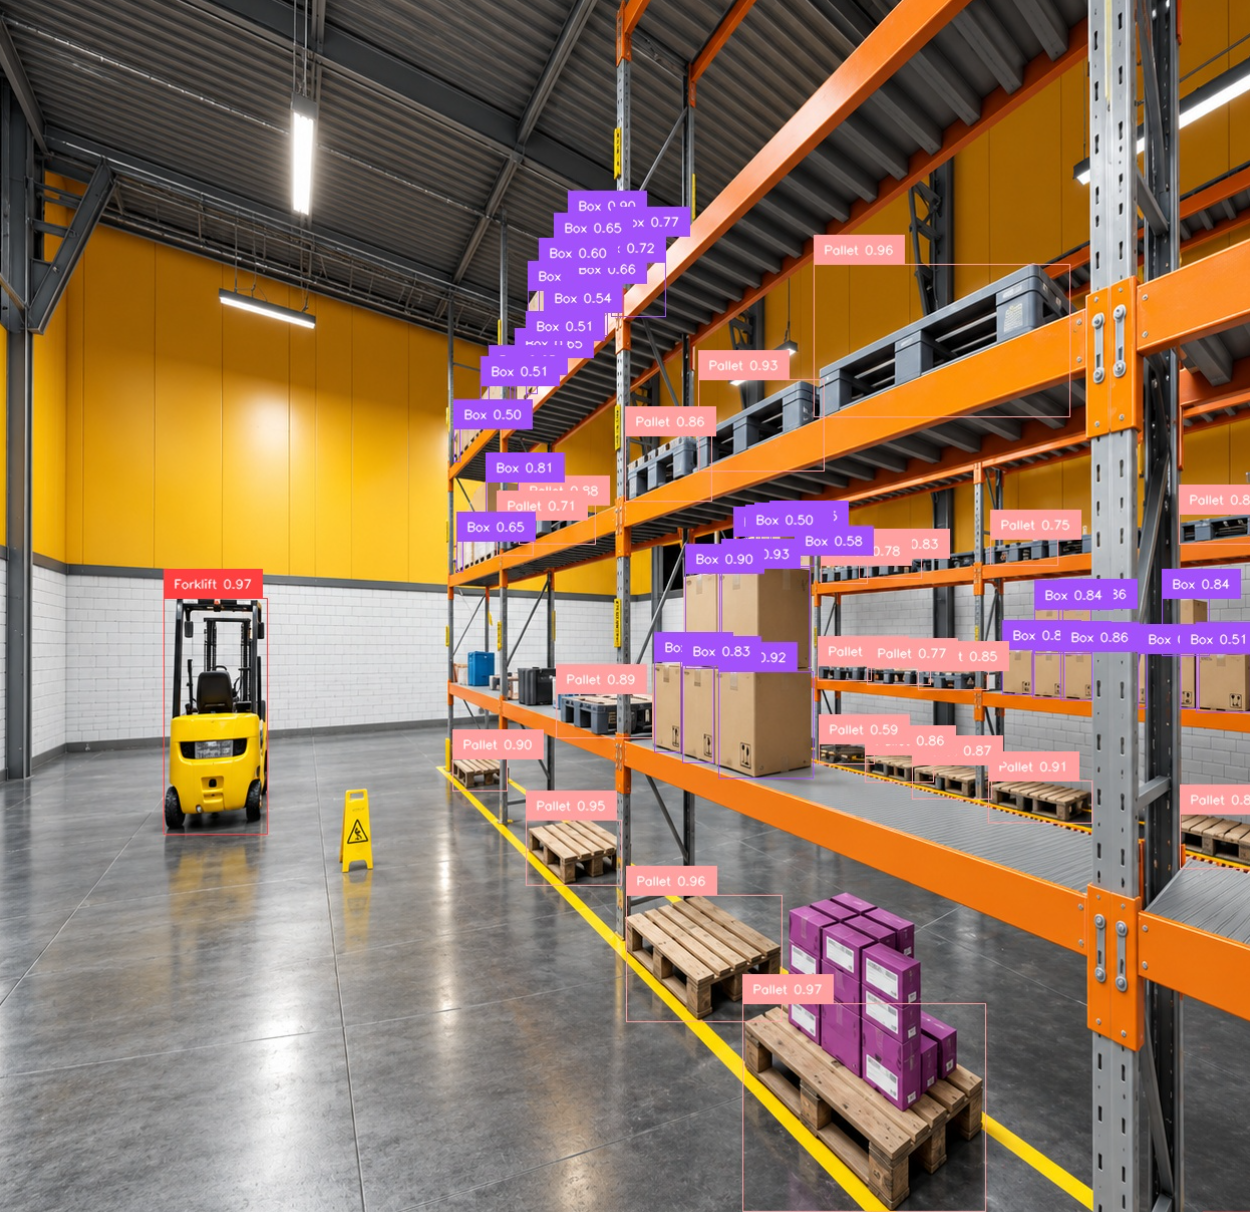
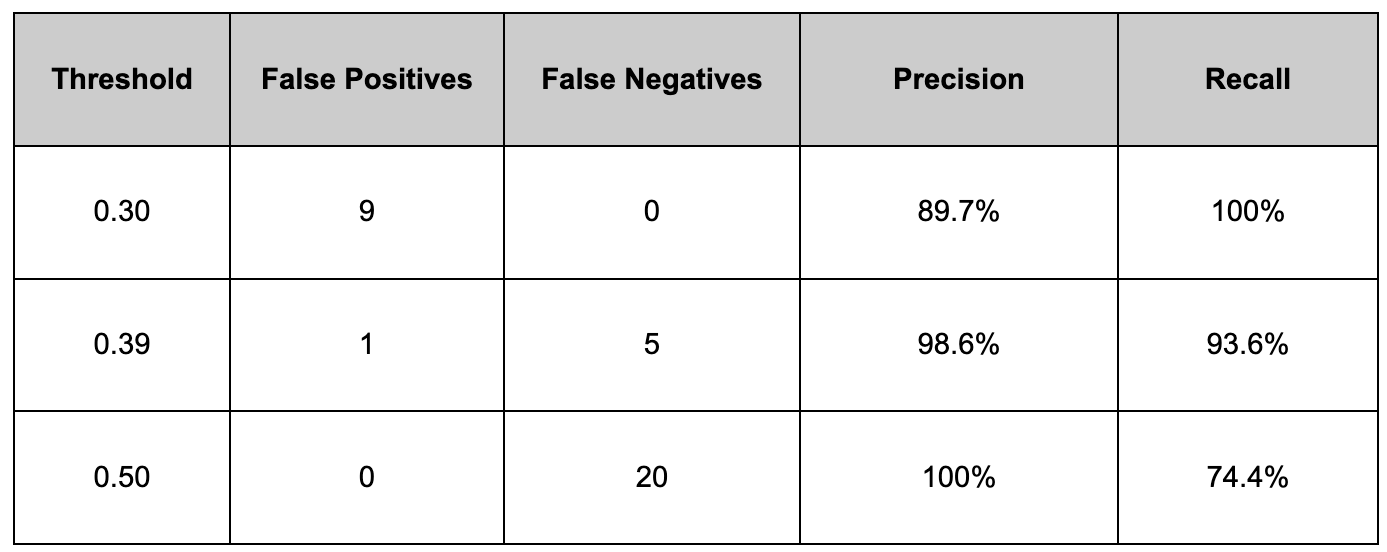
At 0.30, recall reached 100%, with 9 false positives. Raising the threshold to 0.50 removed those false positives; however, 20 real objects were missed and recall fell to 74.4%. At 0.39, precision was 98.6% and recall was 93.6%, making it a more balanced threshold than the others.
The box class showed the clearest change across thresholds, while forklift and pallet detections changed very little.
Validate the Threshold on a Golden Set
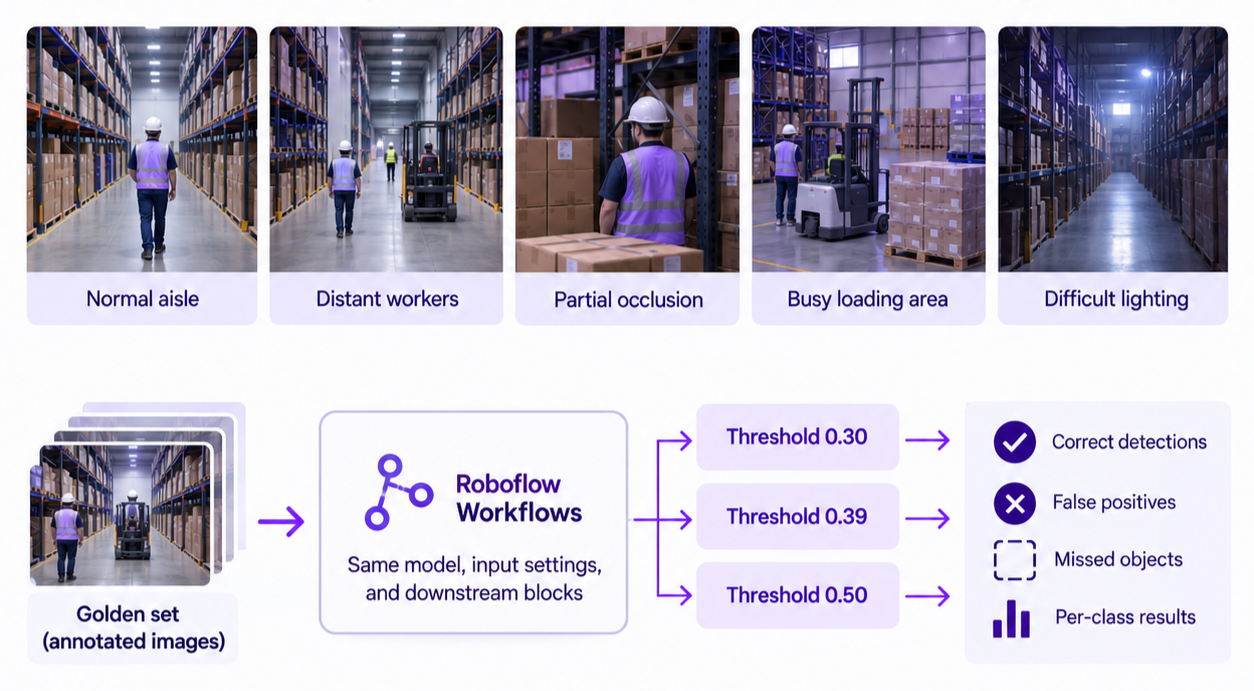
A threshold that works well on one warehouse frame can behave differently when the camera angle, lighting, object size, or scene density changes. Before choosing a final value, test the remaining candidates on a golden set, a fixed collection of annotated images that represents the conditions the model is expected to see after deployment.
For the warehouse model, the set should cover cases that the first test image did not. Include examples such as:
- workers or forklifts farther from the camera
- partially hidden pallets and boxes
- crowded loading areas
- darker or uneven lighting
Run the full golden set through the same Roboflow Workflow at each candidate threshold. Keep the model, input settings, and downstream blocks unchanged so the threshold is the only changing factor.
Then compare the results across the entire set. Count how many detections are correct, how many false positives appear, how many real objects are missed, and which classes are most affected.
Where the errors happen also matters. Missing a worker near moving equipment is more serious than missing one box in a large stack. Use that context when deciding which threshold is acceptable for the warehouse application.
After choosing the final global threshold, keep the golden set fixed. Reuse the same images when evaluating future model versions to check whether performance has improved or worsened.
Apply Per-Class Confidence Thresholds
A single threshold applies the same cutoff to every class. If some classes need different cutoffs, use class-specific overrides for those classes and keep a default threshold for the rest. A class producing weak predictions may need a higher cutoff, while classes that already perform well can stay at the default.
In Roboflow Workflows, add a Per-Class Confidence Filter after the Object Detection Model and connect the model predictions to the filter. Set the model confidence at or below the lowest threshold you want to use. For example, if the model runs at 0.39, you can apply higher class-specific thresholds in the filter:
- Worker: 0.43
- Forklift: 0.55
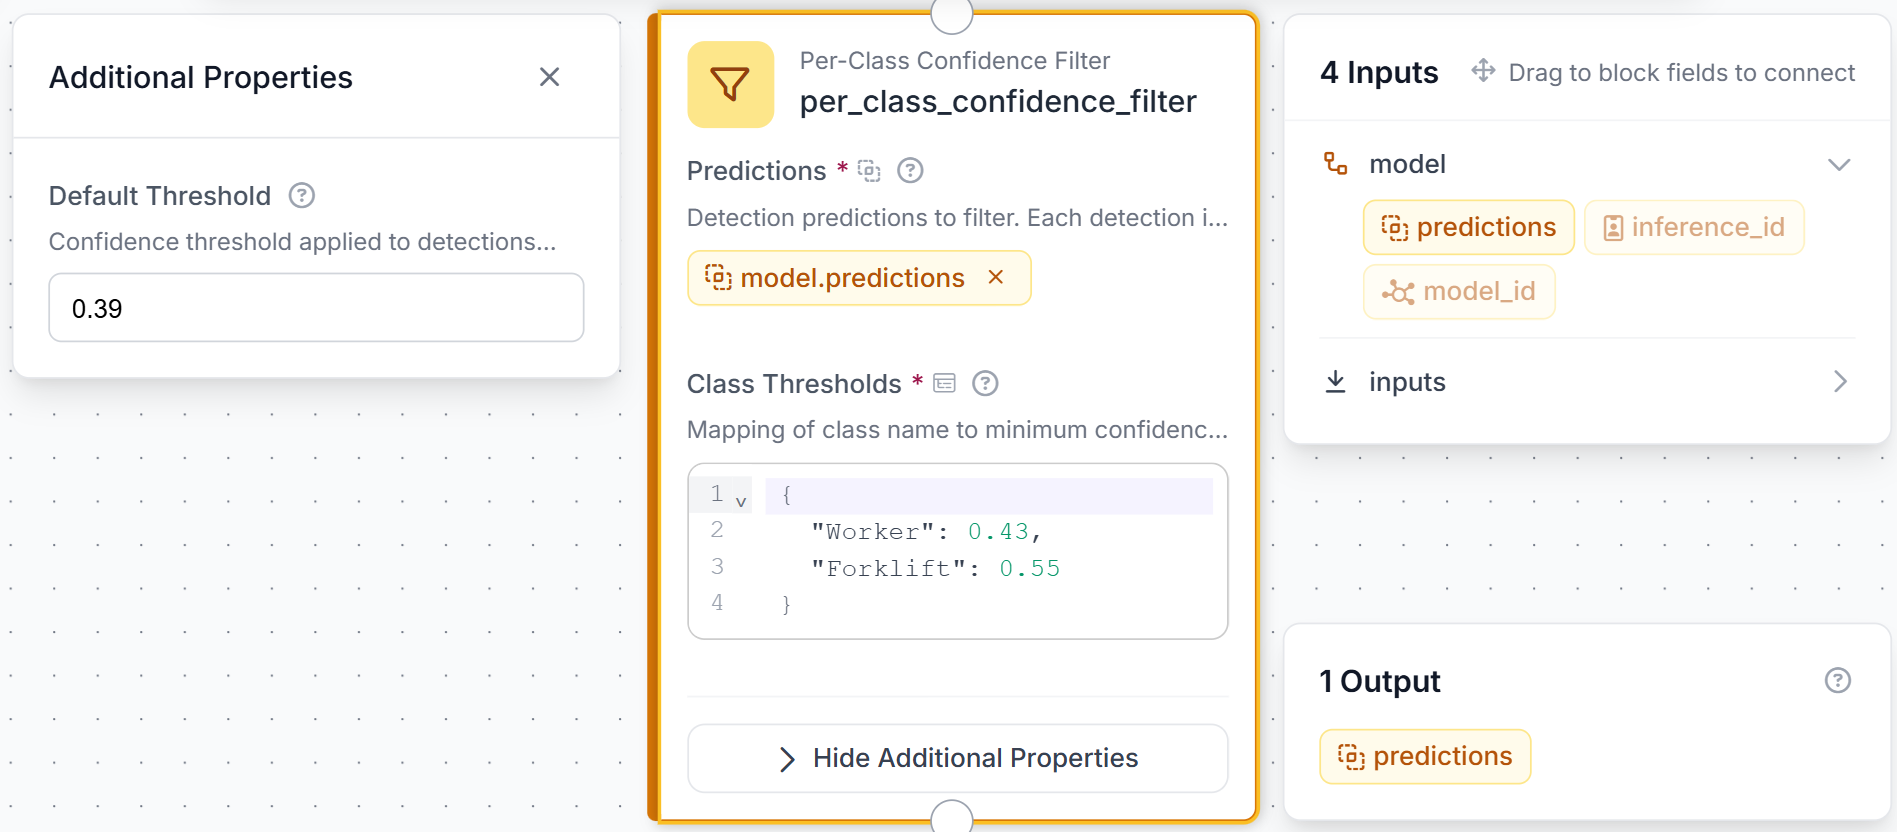
Classes without a class-specific value continue using the default threshold. You can then connect the filtered predictions to the visualization and other downstream blocks.
After setting the class-specific thresholds, rerun the same golden set and compare the results by class. Check whether the new thresholds remove weak predictions without causing many valid detections to be missed.
Handle Detection Problems That Confidence Thresholds Cannot Fix
Some errors remain even after the confidence threshold is adjusted correctly. You may see several overlapping boxes around the same object, conflicting predictions from different models, or detections whose confidence is too low for an automatic decision. These problems need different controls.
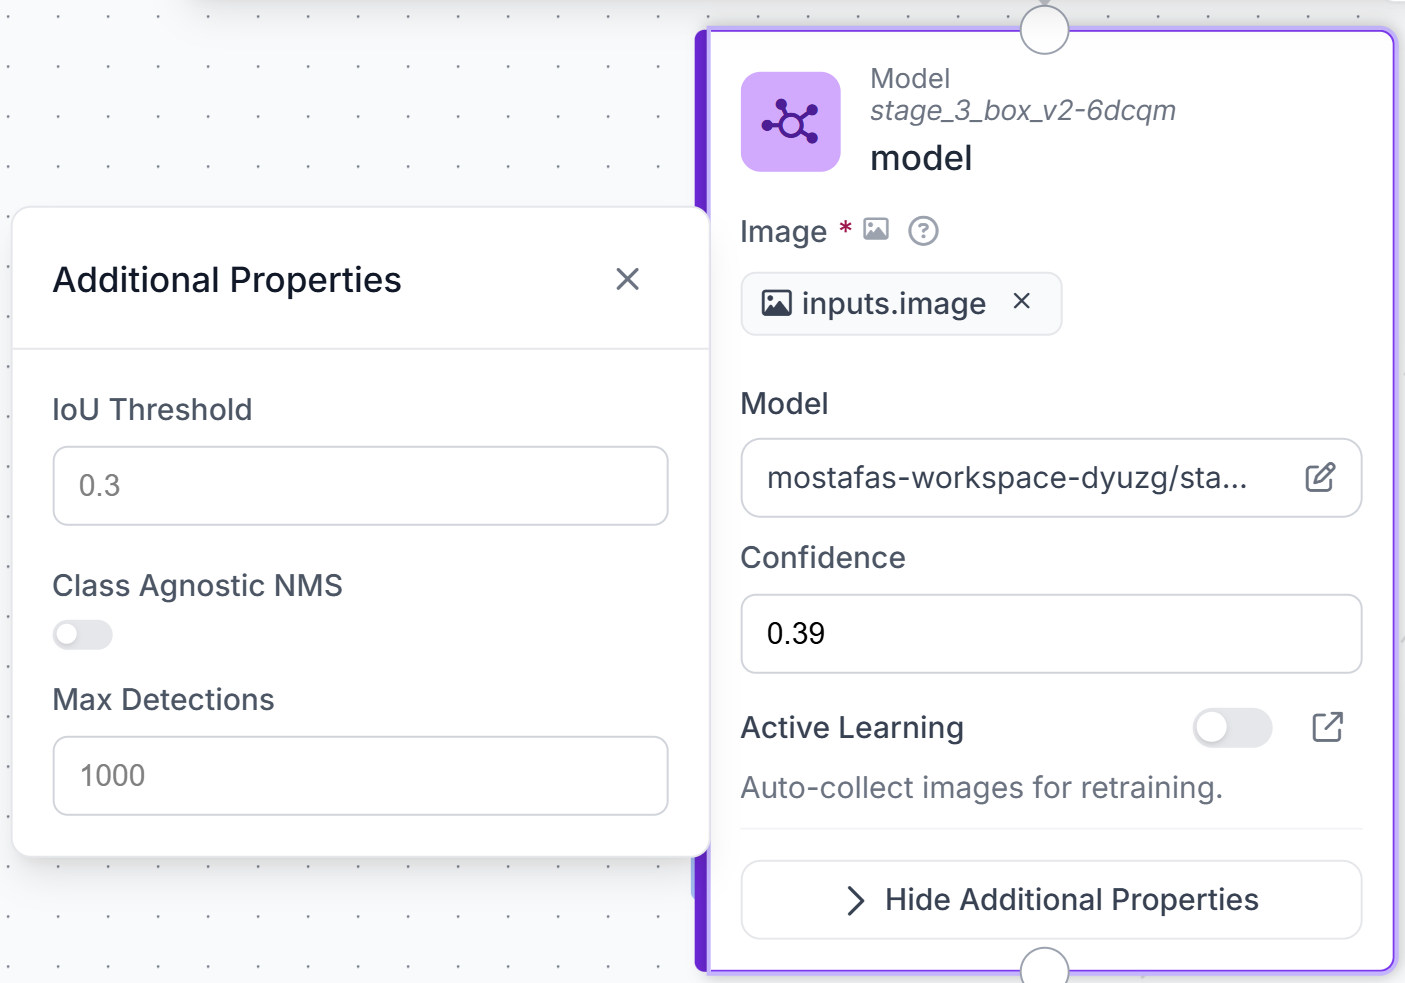
For duplicate boxes, use Non-Maximum Suppression (NMS) and its IoU threshold. NMS compares overlapping boxes and keeps the one with the higher confidence score, while the IoU threshold controls how much overlap is allowed before another box is removed. A lower NMS IoU threshold removes overlapping boxes more aggressively, while a higher value allows more overlap to remain. This is usually a better setting to adjust when the problem is duplicate detections, because raising the confidence threshold can also remove valid predictions elsewhere in the image.
In Roboflow Workflows, the Object Detection Model block includes an IoU Threshold setting for NMS. It controls how much two predicted boxes can overlap before NMS treats them as duplicates and removes one.
Confidence ranges can also control what happens to a detection after the model runs. For example:
- Above 0.70: accept the detection automatically
- 0.40–0.70: send it for verification or human review
- Below 0.40: ignore it
A Detections Filter can separate predictions by confidence. Continue If or Condition blocks can control which branch runs for each range. High-confidence detections can continue automatically, while middle-range detections can be routed to Human-in-the-Loop review. Reviewed images can be added to an Active Learning process for future model improvement.
When uncertainty comes from disagreement between models rather than confidence alone, Detections Consensus can combine their predictions and require agreement before the result continues downstream. Another option is a two-stage verification method: the first model finds candidates, then a second model or another Workflow branch checks uncertain cases.
Starting Confidence Thresholds to Test by Use Case
Use these ranges to choose the first values to test, rather than treating them as final deployment settings.
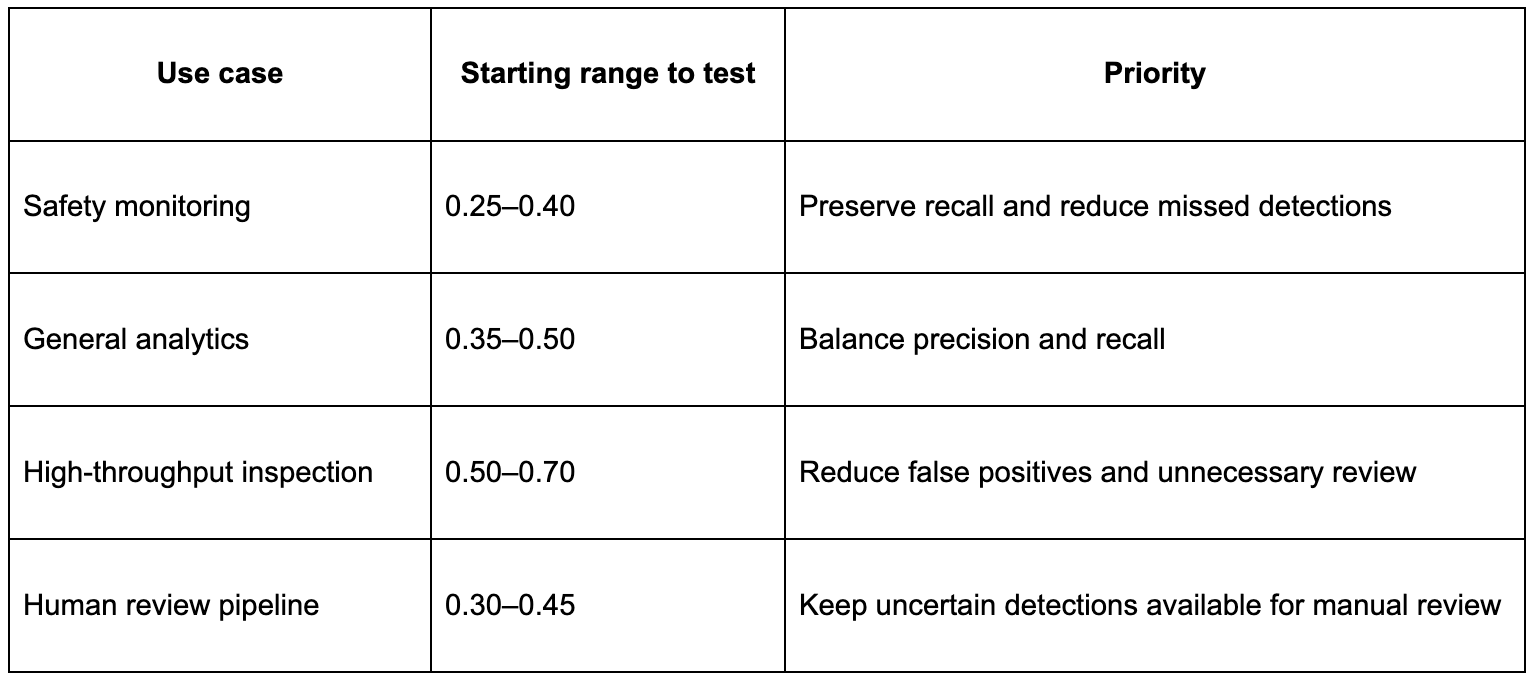
Pick the range that fits your use case. Start lower if missed detections are the bigger problem, and start higher if false positives are more costly.
Conclusion
A high mAP score does not tell you which confidence threshold will work best after deployment. That decision depends on which mistakes matter most for your application.
Use the precision-recall curve in Model Evaluation to find a few thresholds worth testing, then compare them in Workflows and on the golden set. If the results vary a lot by class, use class-specific thresholds. If threshold tuning leaves duplicate boxes, handle those separately. Use NMS and its IoU threshold for duplicate detections, and route uncertain detections for human review.
Recheck the threshold when you change the model, when production data changes, or when the cost of false positives and missed detections changes.
Further Reading:

 点赞
点赞 收藏
收藏 点踩
点踩 分享
分享