How to Auto-Label Image Data with Gemini 3.7 in Roboflow

SUMMARY
You can label an object detection dataset without drawing boxes by hand: give Roboflow Auto Label your class names and Gemini 3.7 Flash draws bounding boxes on every image, at a rate of 1,000 images per credit. Gemini reads only the class name (not the description field) and returns every box at full confidence, so a quick review pass to fix missed or loose boxes is the only manual work left.
Training an object detector starts with images where every object you want it to detect has a bounding box. Those boxes are usually drawn by hand, one object at a time, which can take a huge amount of time as the dataset grows.
These labels show the detector what to look for and where each object is in the image. It needs to see the same objects labeled across many images to learn what they look like and where they appear, so the dataset has to be labeled before training starts.
You can use zero-shot detection to reduce the amount of manual labeling required. Instead of labeling every example by hand, you name the objects you want to detect, and a vision-language model finds them in your images. Roboflow Auto Label lets you do this with Gemini 3.7 Flash.
In this tutorial, you’ll learn how to use Roboflow to use Gemini to label an image dataset, then review the results and correct any boxes it misses or places incorrectly.
How Auto-Labeling with Gemini 3.7 Labeling Works
When you run Roboflow Auto Label with Gemini (Boxes), Gemini 3.7 Flash looks at each image, finds the classes you listed, and draws a bounding box around every object it detects.
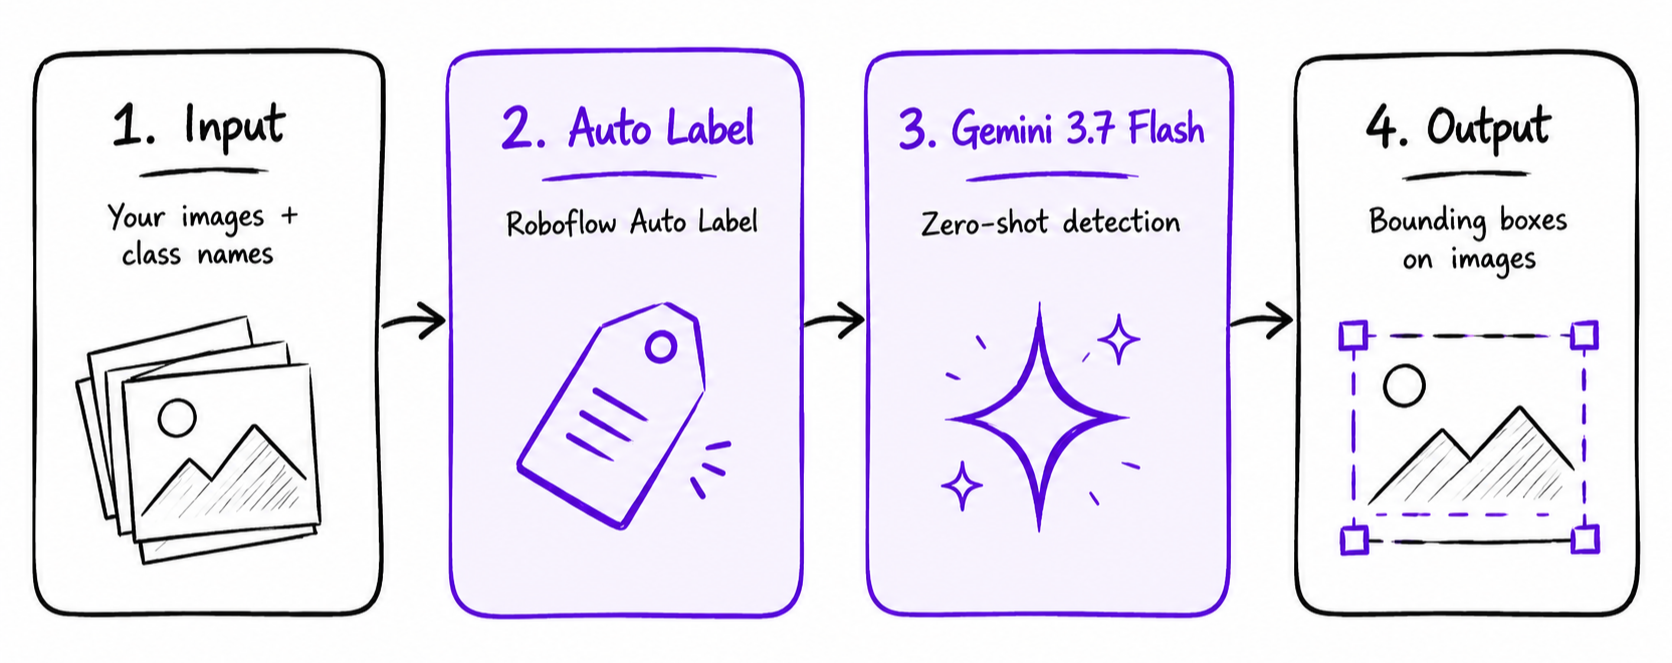
There are three things to know regarding how Gemini labels images that will impact how you set up your classes and read the output:
- It uses class names, not descriptions. The class name is the whole prompt. Auto Label shows a description field, but Gemini ignores it.
- Every box comes back at full confidence. There is no per-class score, so the confidence filter is off. You delete the wrong boxes during review.
- It returns boxes, not masks. Gemini (Boxes) does object detection only. For masks, use a different model.
In practice, this means you label with class names and fix the output by hand.
Labeling Your Data in Roboflow: Step-by-Step
Step 1: Find a dataset on Roboflow Universe
Roboflow Universe has a large collection of open-source computer vision datasets, so you can often find one that already contains the objects you need. It includes more than 1 billion images, 1 million datasets, and 250,000 fine-tuned models, giving you plenty of options to choose from.
For this tutorial, you’ll use the clean Aquarium dataset.
Click on the "Images" tab to access all the images contained in the dataset. It is here that you will choose which images you want to clone.
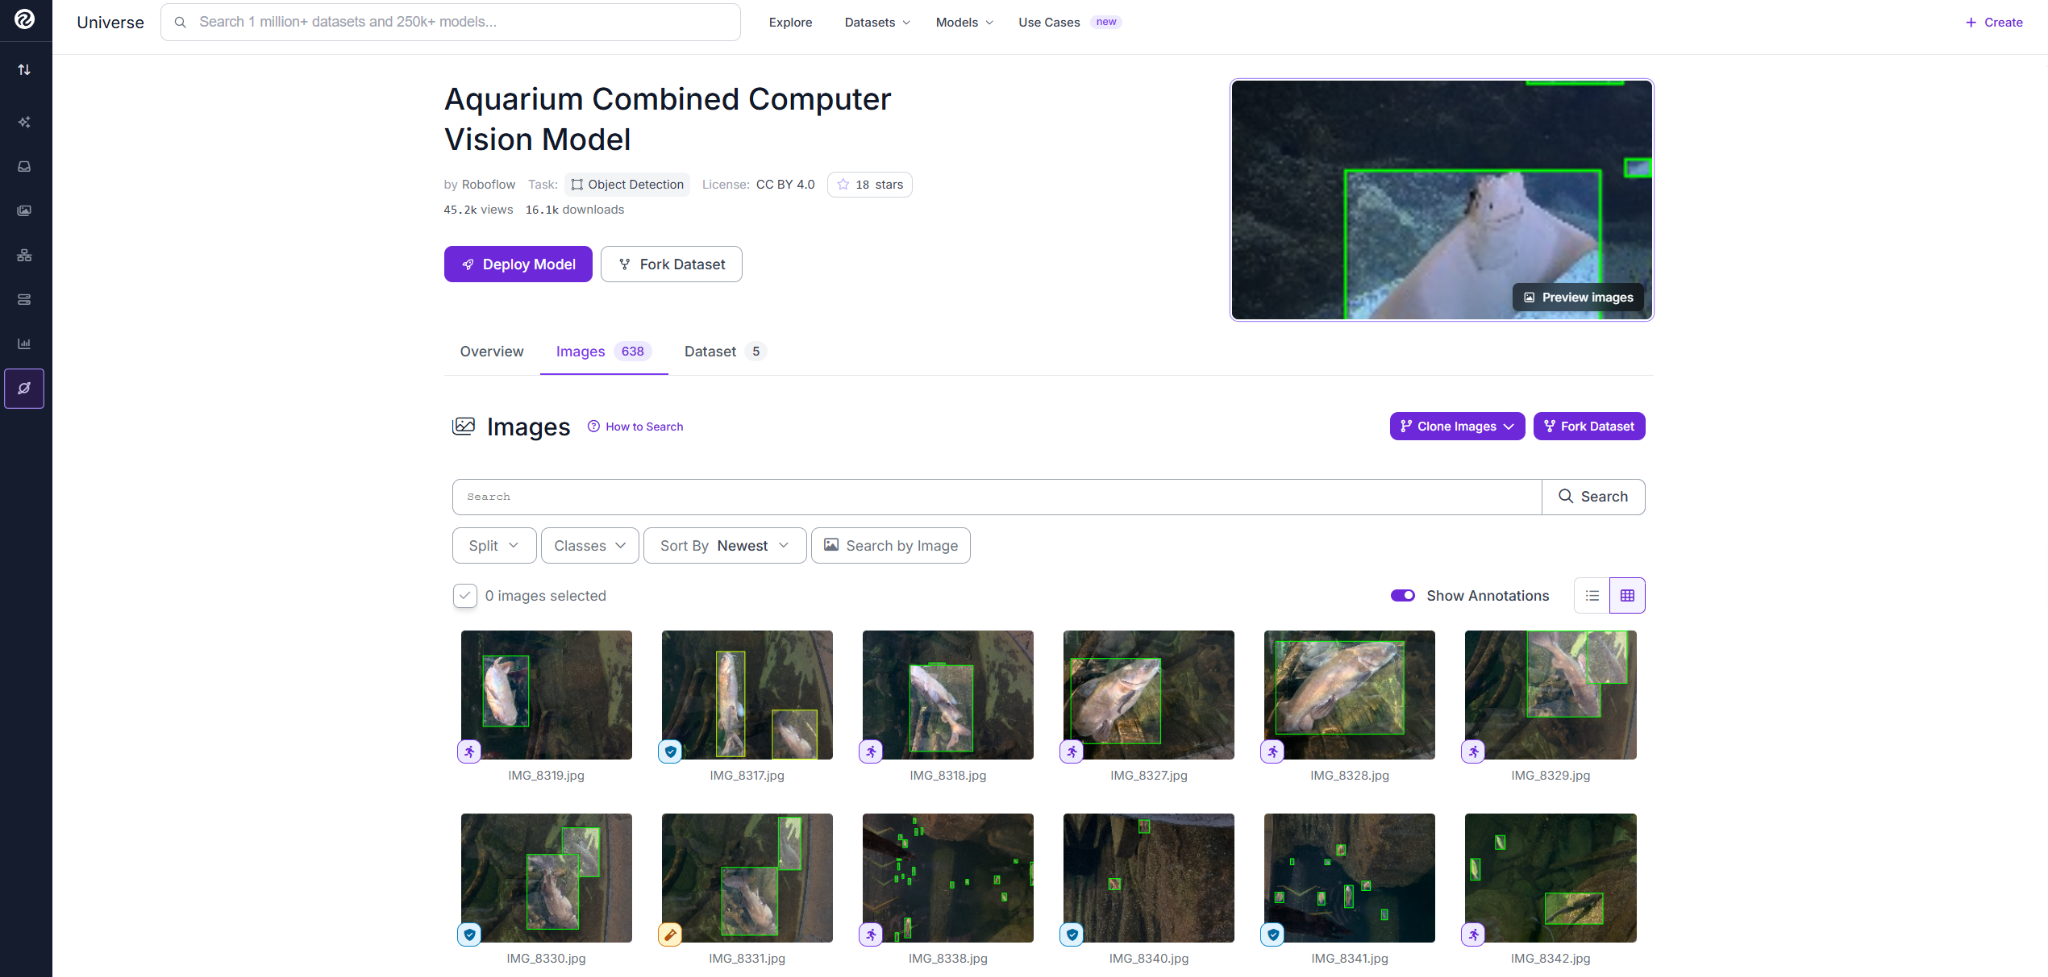
Any image dataset with objects for the purpose of object detection is appropriate for use in this case, because all that is required are the images.
Step 2: Create an empty project to hold the images
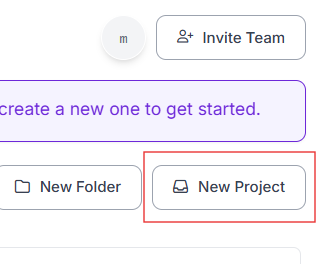
In Roboflow, open the Projects page from the left panel and click New Project in the top right.
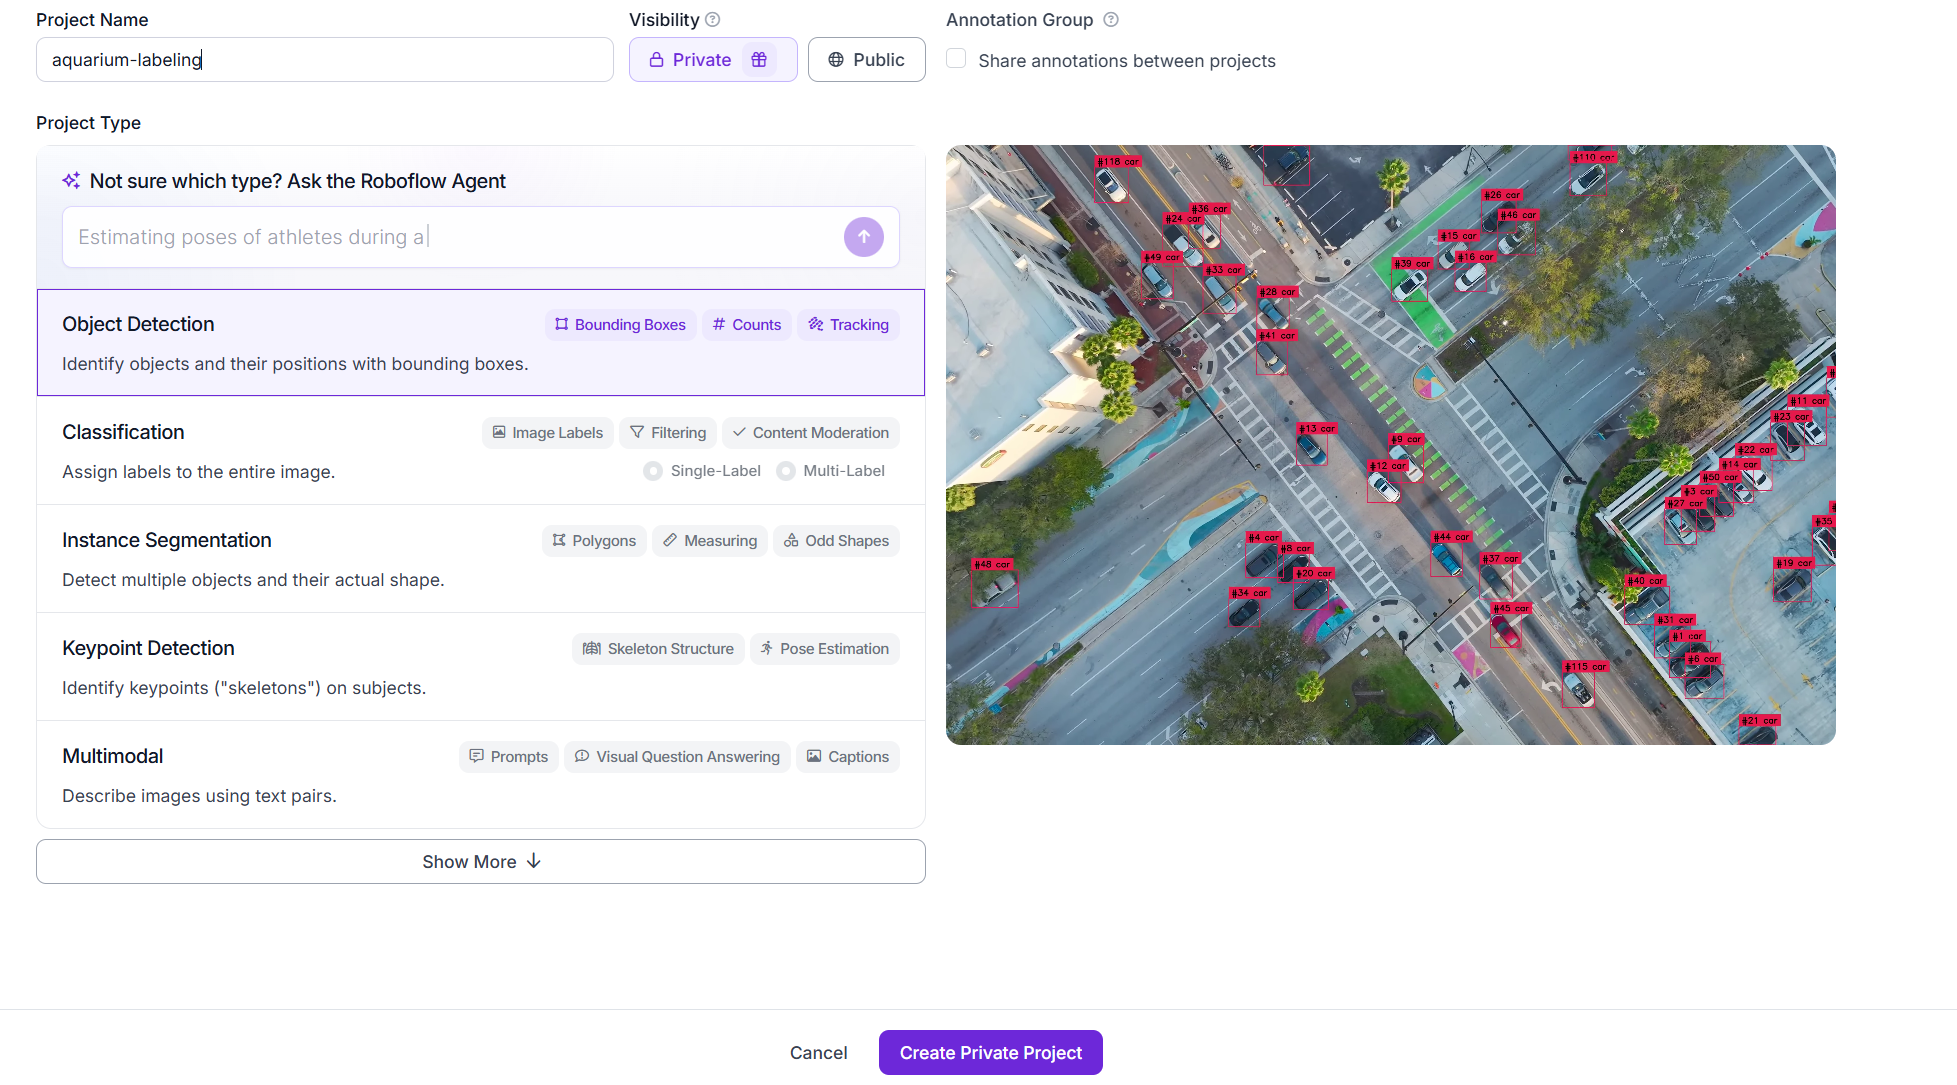
Give the project a name (here, aquarium-labeling), leave visibility as Private, and set the Project Type to Object Detection. Then click Create Private Project.
The project starts empty with 0 images, ready for you to clone the dataset into it in the next step.
Step 3: Clone the raw images into your project
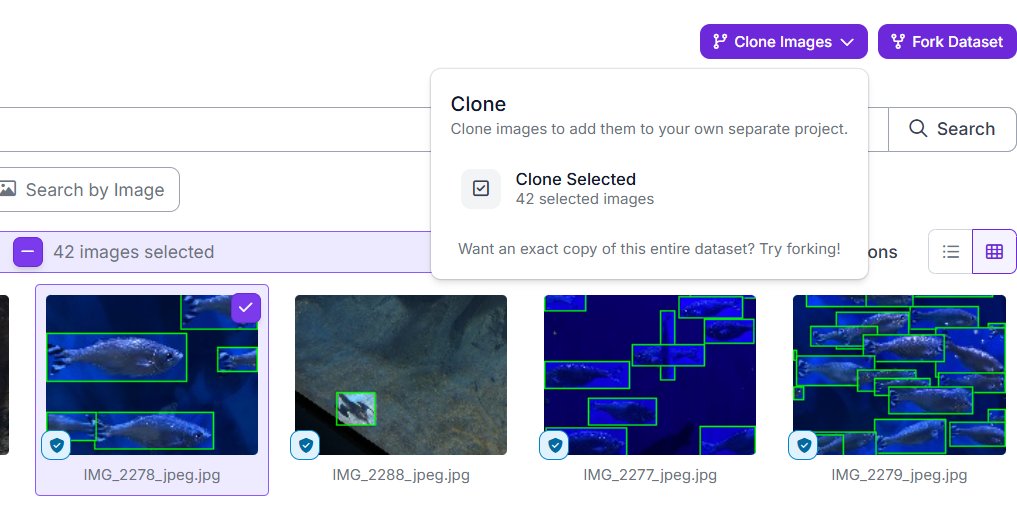
Open the Aquarium dataset on Universe and go to the Images tab. Select the images you want to label, then open the Clone Images menu and choose Clone Selected. This tutorial uses 42 images, enough to see how Gemini performs across a batch.
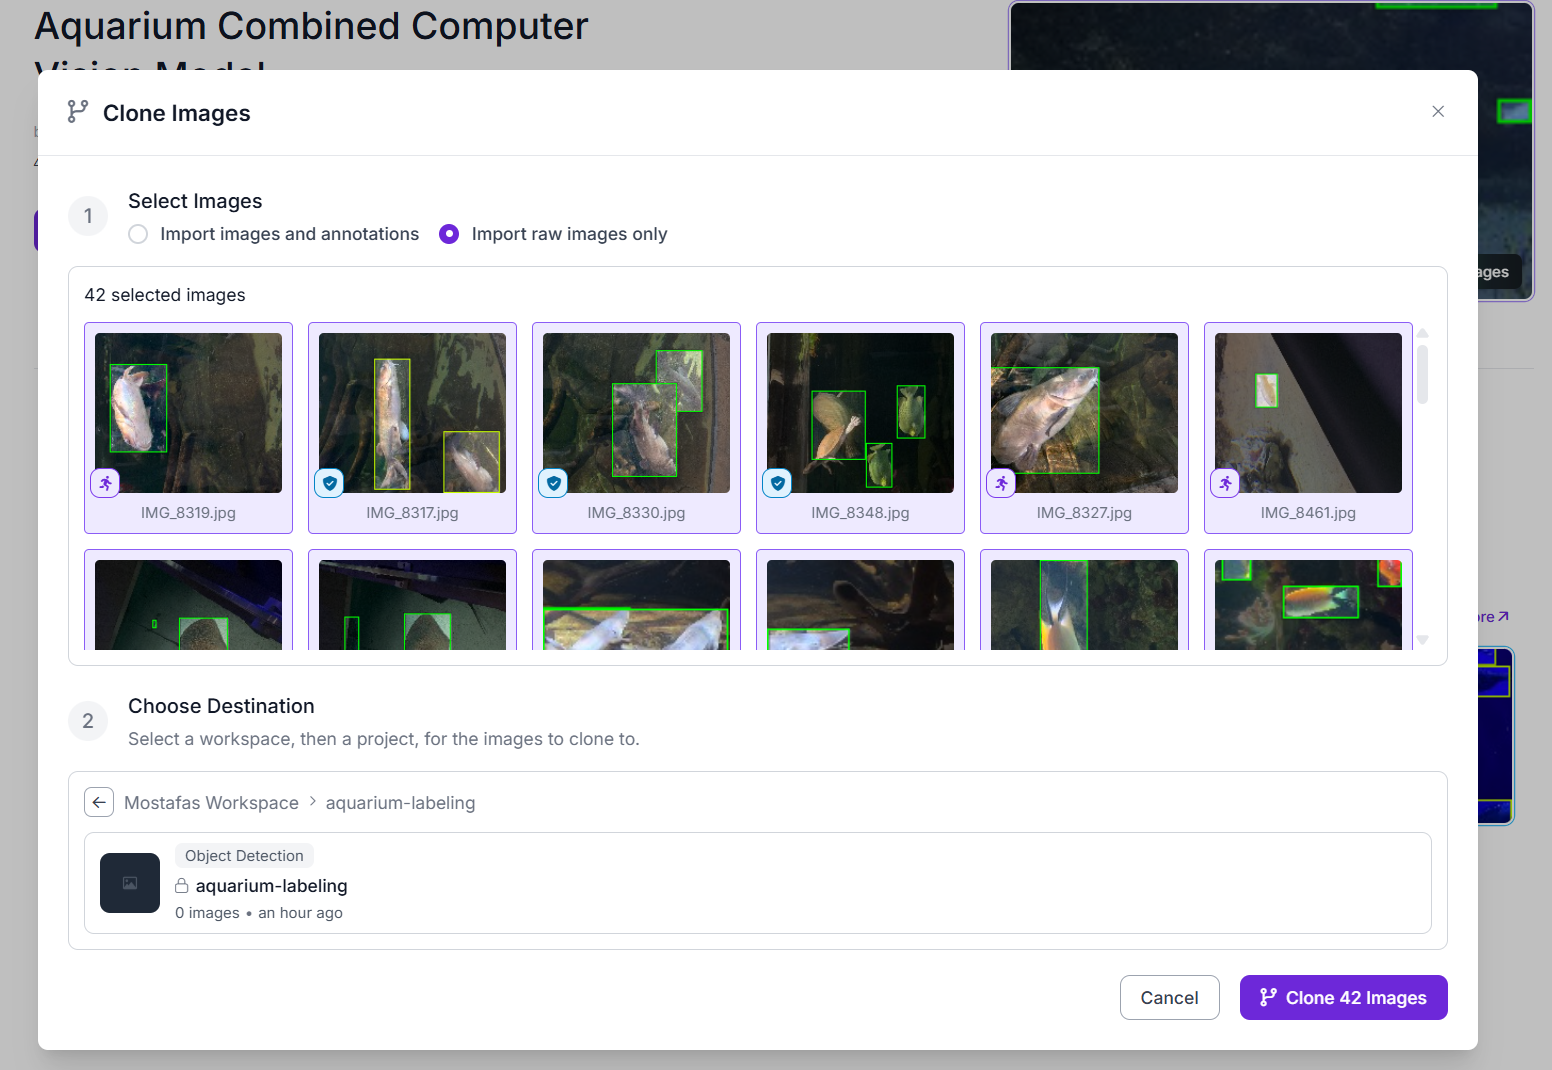
In the Clone Images dialog, choose Import raw images only so the existing labels are left behind and Gemini can label from scratch. Under Choose Destination, pick your workspace and the empty object detection project you created, then click Clone Images.
Once the clone finishes, the images appear in your project without labels, ready for Gemini to annotate.
Step 4: Open Auto Label on the cloned batch
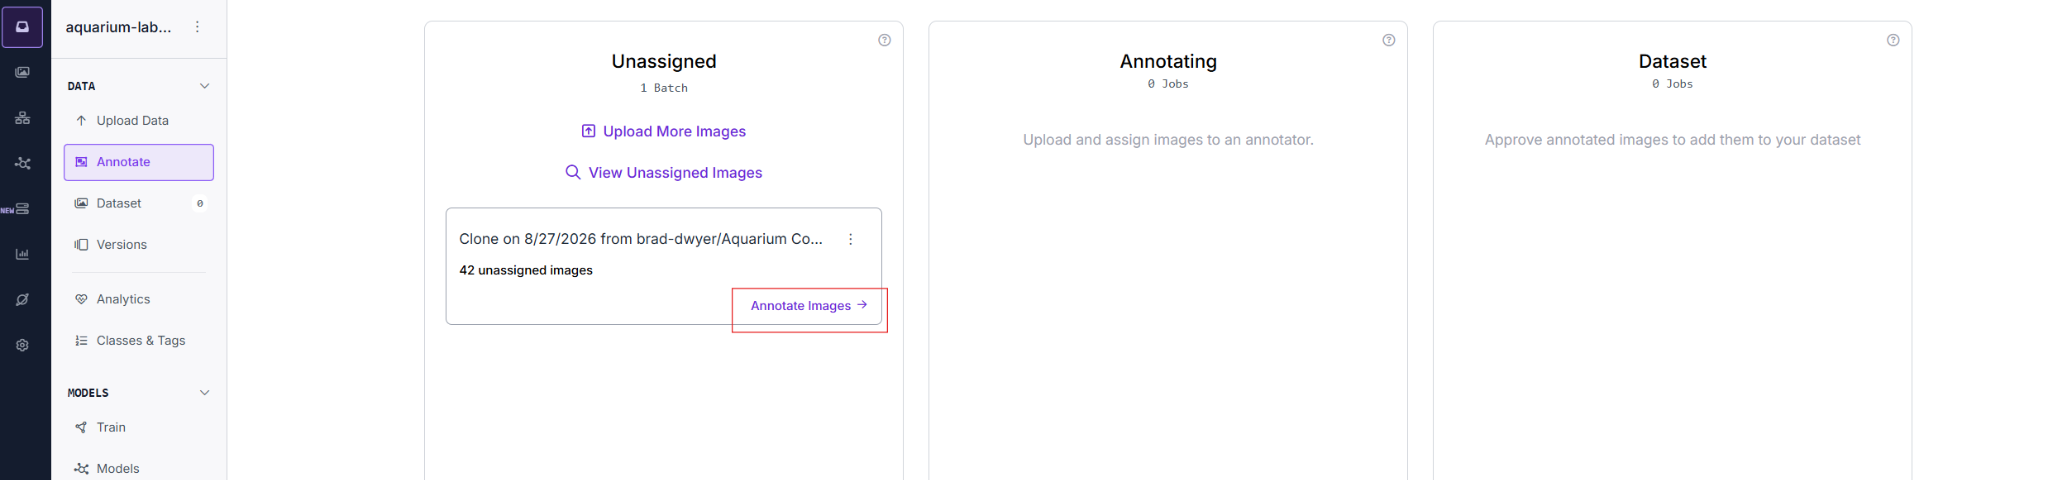
Go to your project and open the Annotate tab. The cloned batch appears under Unassigned. Click Annotate Images on the batch card.
On the right, choose Label in minutes. This opens the Auto Label interface, where you set your classes and choose the model. SAM 3 (Masks) is selected by default, which you will change to Gemini.
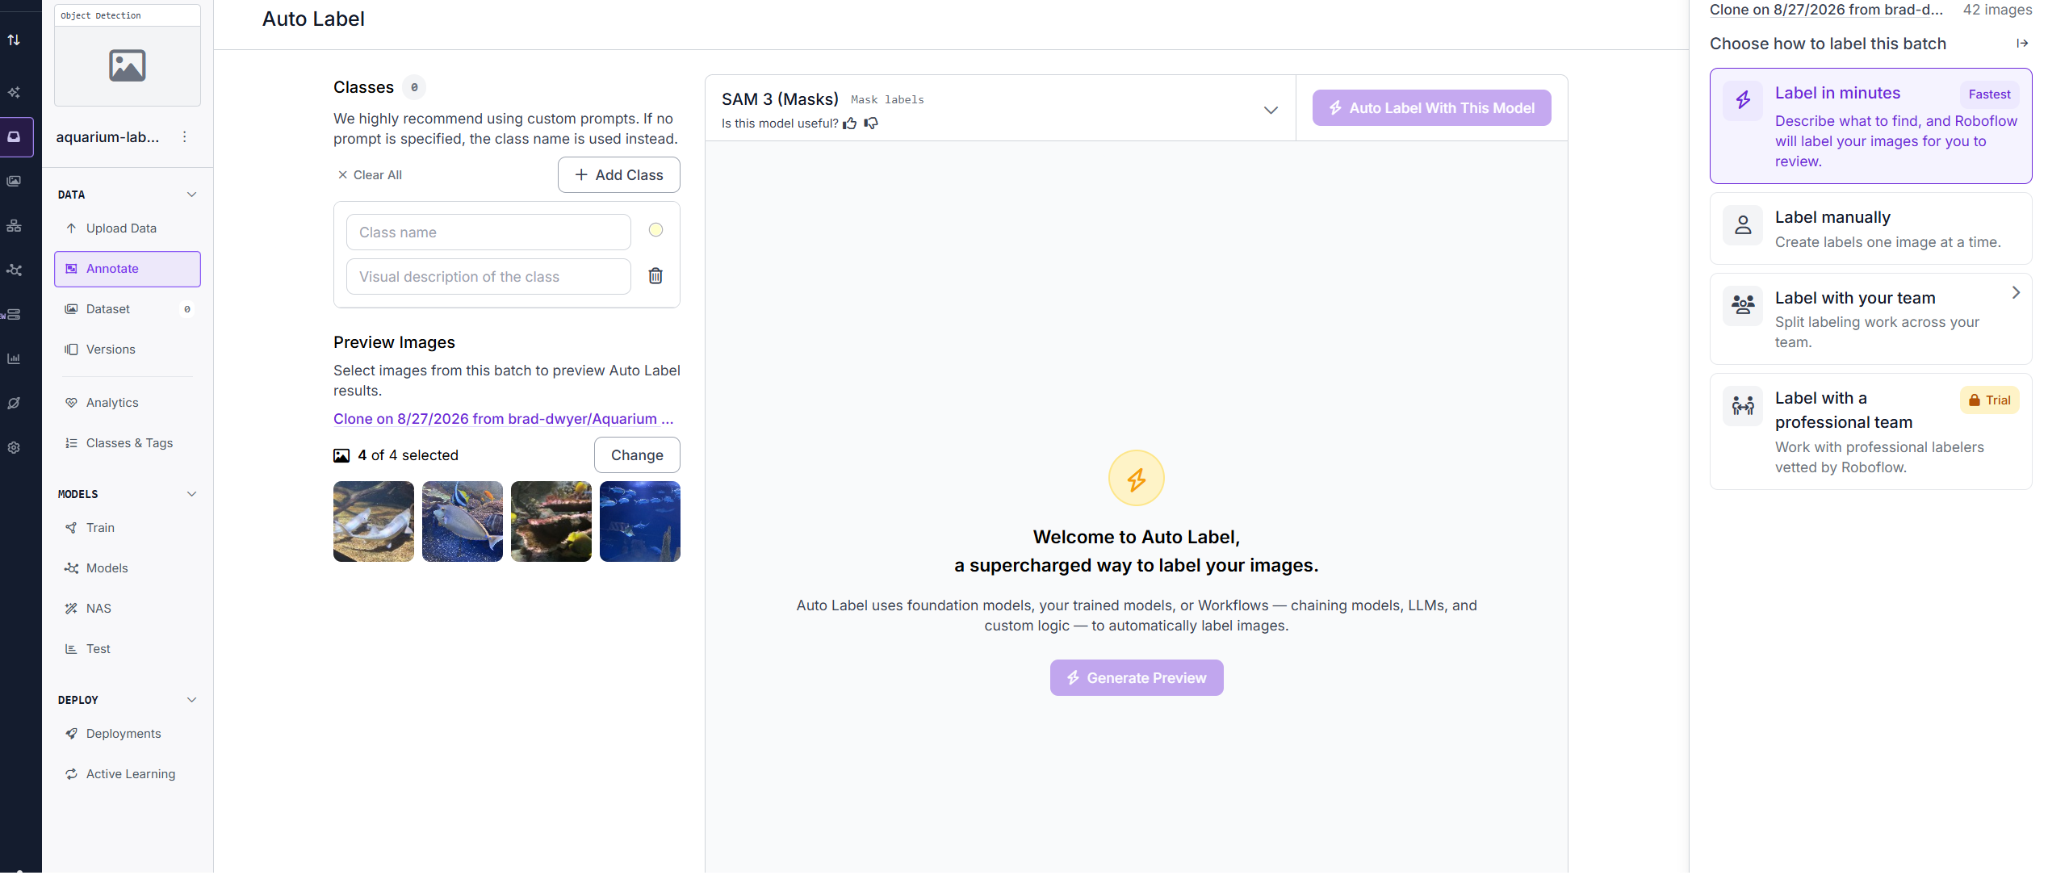
The setup is two steps: first enter the classes you want to detect, then select Gemini as the model. The next steps walk through each.
Step 5: Enter your classes
In the Classes panel, type a class name and click + Add Class. Leave the "Visual description" field empty. Gemini reads only the class name, so anything you type there has no effect. Repeat for each class you want.
You are not limited to the classes in the original dataset, and you do not have to use all of them. Add only the classes you want to label. This dataset has several, but here you label four: fish, jellyfish, shark, and stingray.
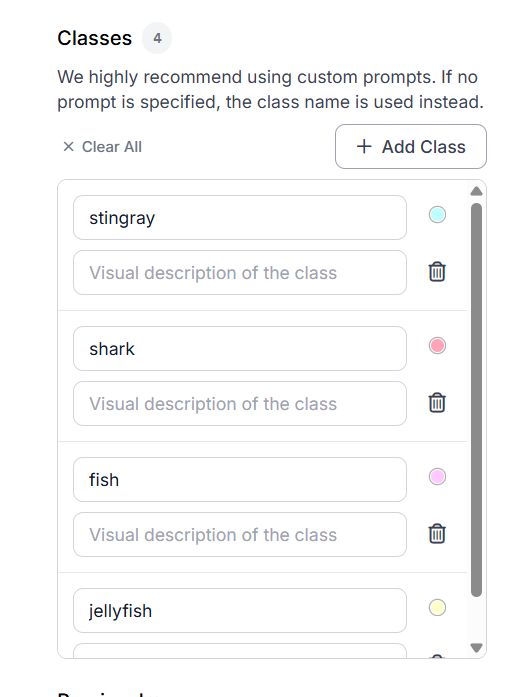
Add your classes before you select Gemini, because choosing the model runs a preview automatically, so your classes need to be in place first. With them set, you are ready to select the model.
Step 6: Select Gemini and preview the results
With your classes set, open the model dropdown. Make sure you are on the Foundation Models tab, then choose Gemini (Boxes).
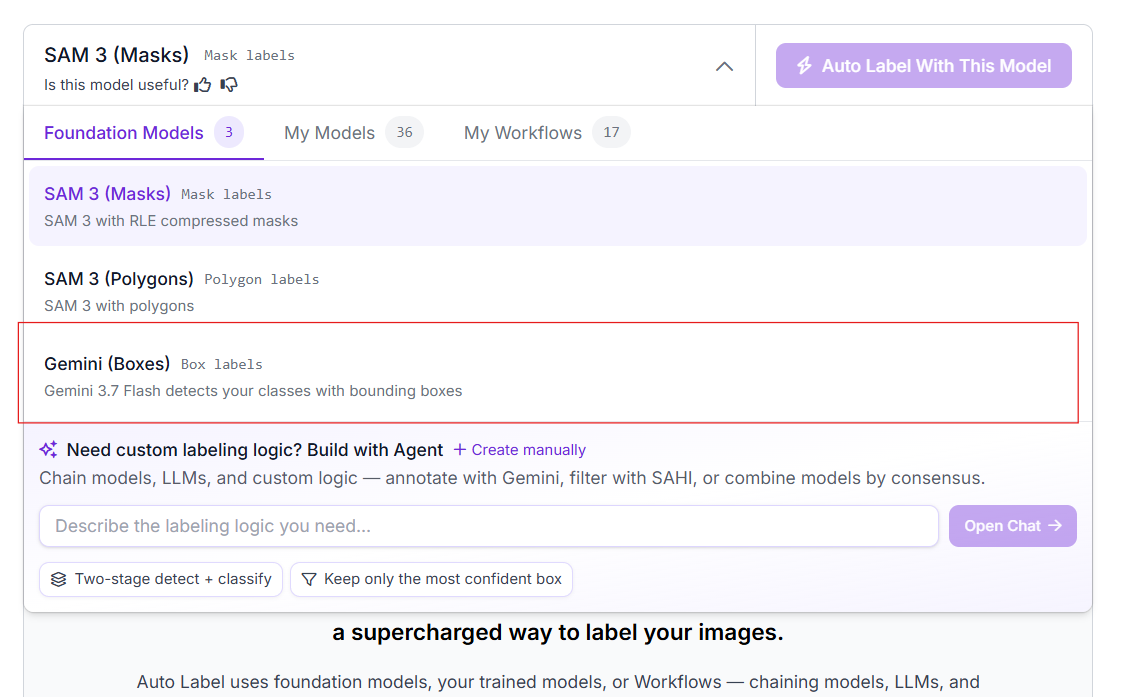
As soon as you select Gemini, it runs on a few sample images and draws boxes for your classes. Roboflow picks these sample images for you, and you can swap them with the Change button to test on different ones.
On these aquarium images, Gemini does a good job with the classes. It boxes the fish and correctly labels the shark and stingray as their own classes instead of grouping them with the fish. This shows that it can use the class names to distinguish between the different objects.
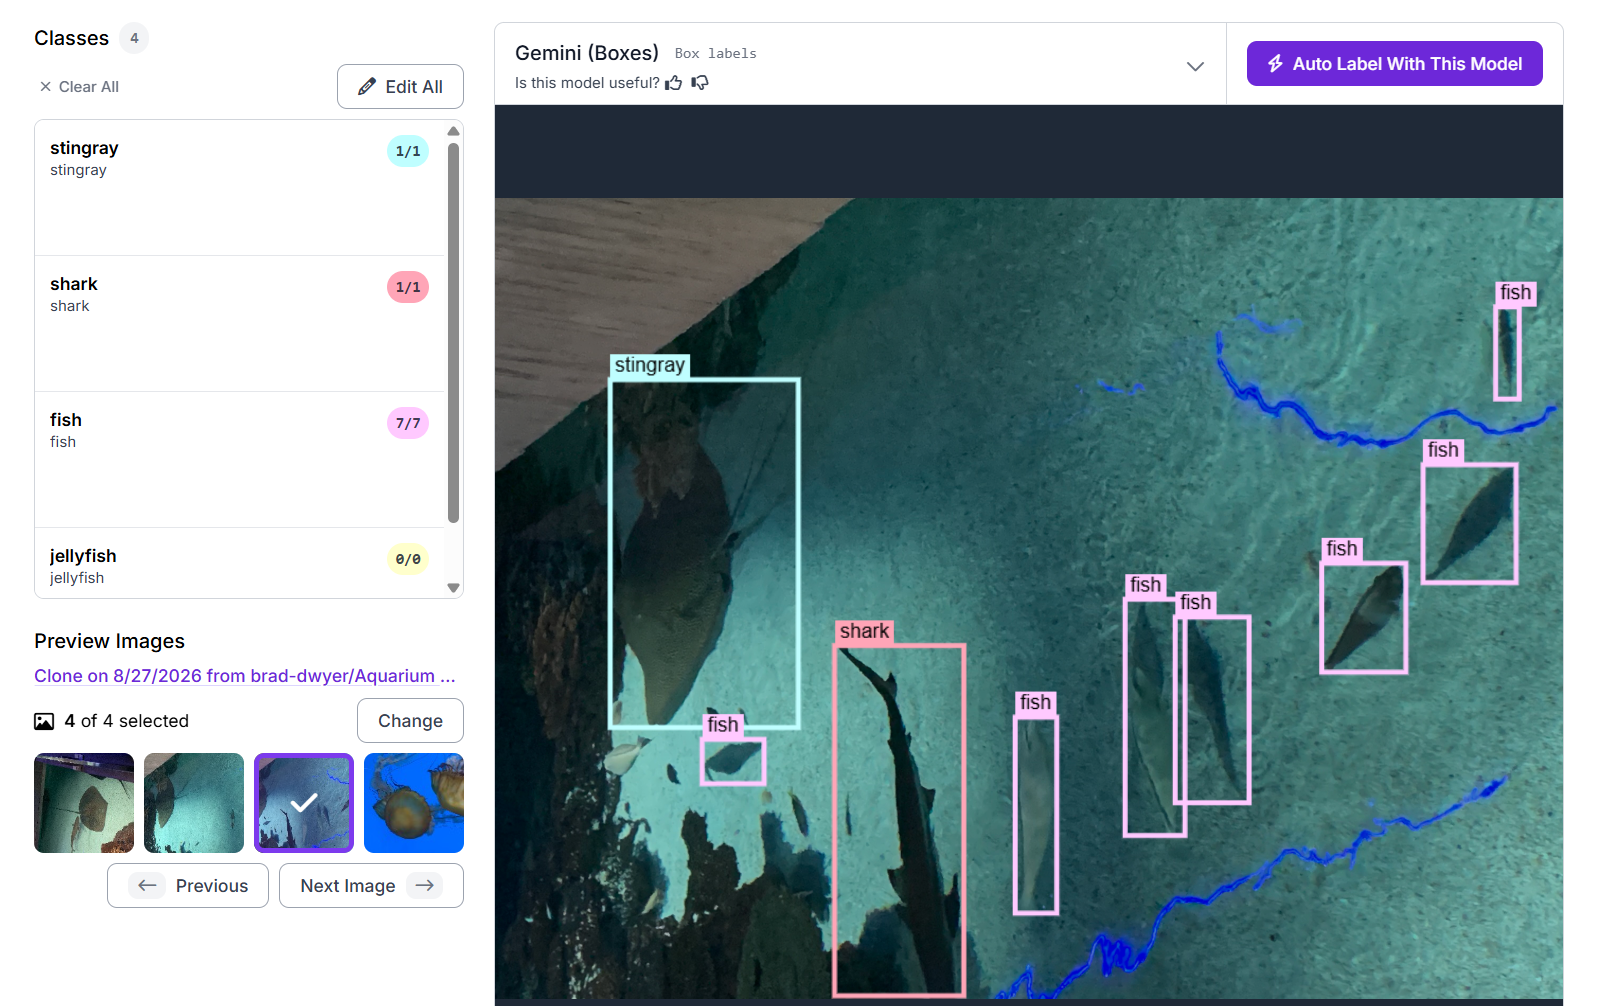
This is also where you can see that the description field is ignored. When we set the class shark with the description "tiny yellow fish", Gemini still boxed and labeled the shark correctly, going by the class name alone.
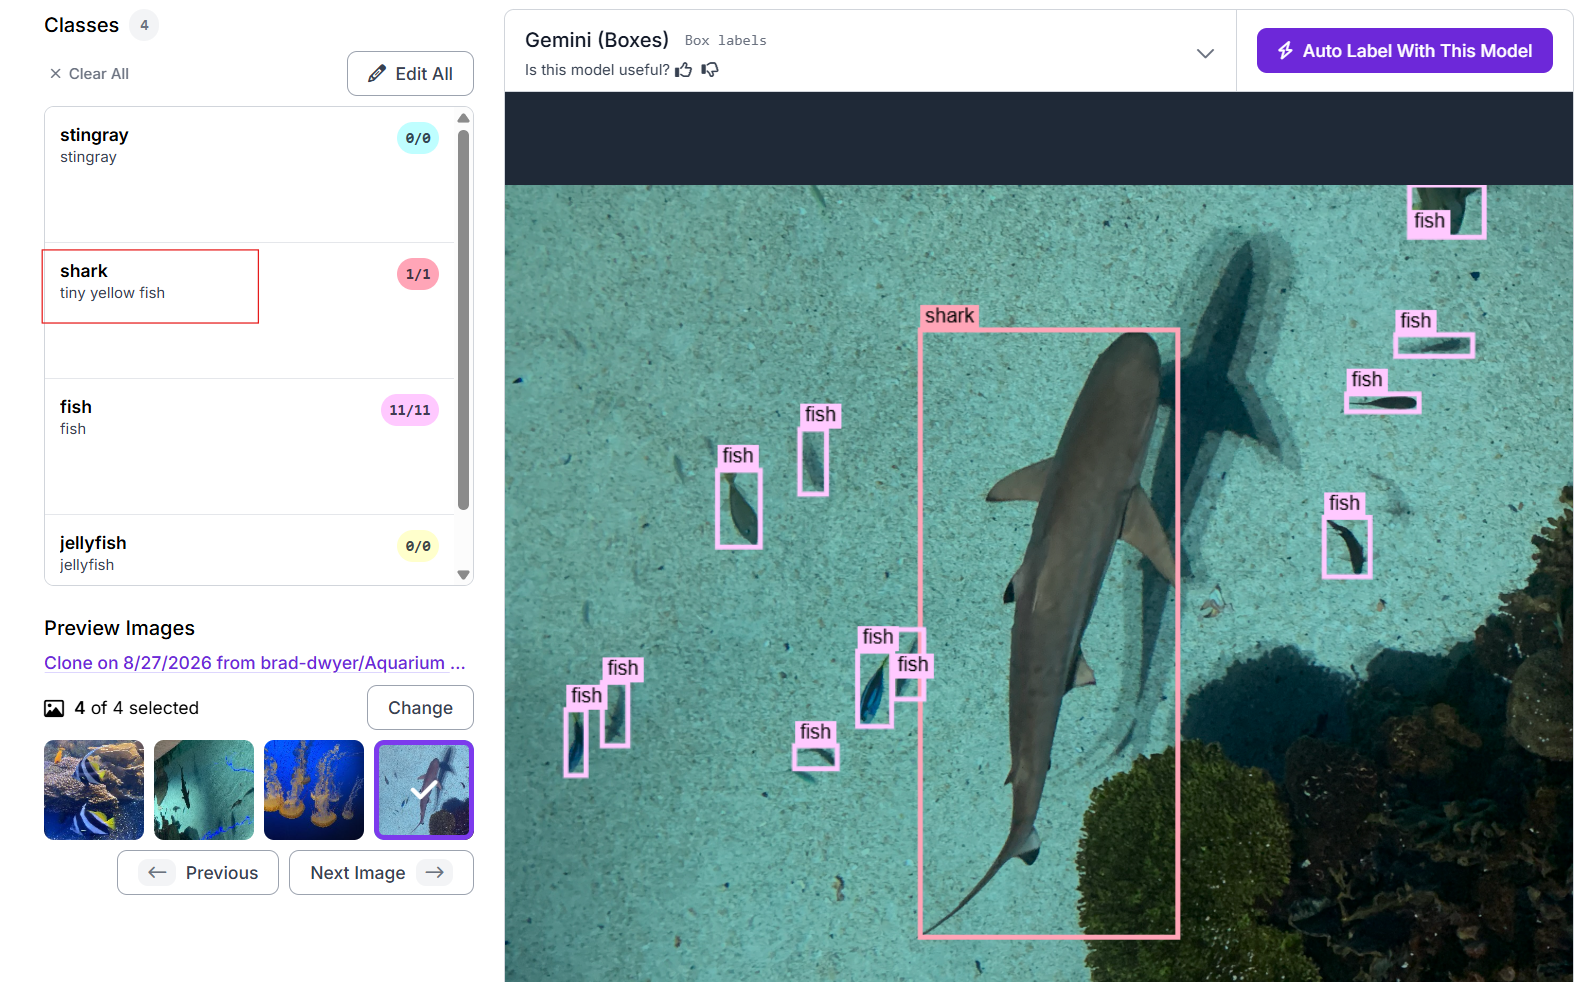
The results are generally good, with a few minor adjustments needed. In some images, Gemini drew overlapping or duplicate boxes around the same animal. These are easy to clean up during the review step, while the bulk of the labeling is already done for you.
Step 7: Label the full batch
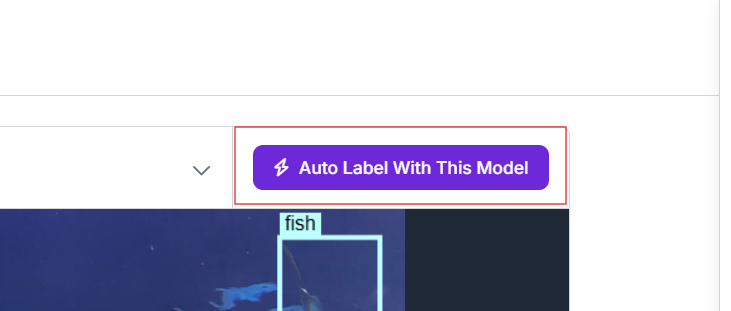
Once you've checked the preview on a few different images and Gemini is labeling them well, click Auto Label With This Model in the top right.
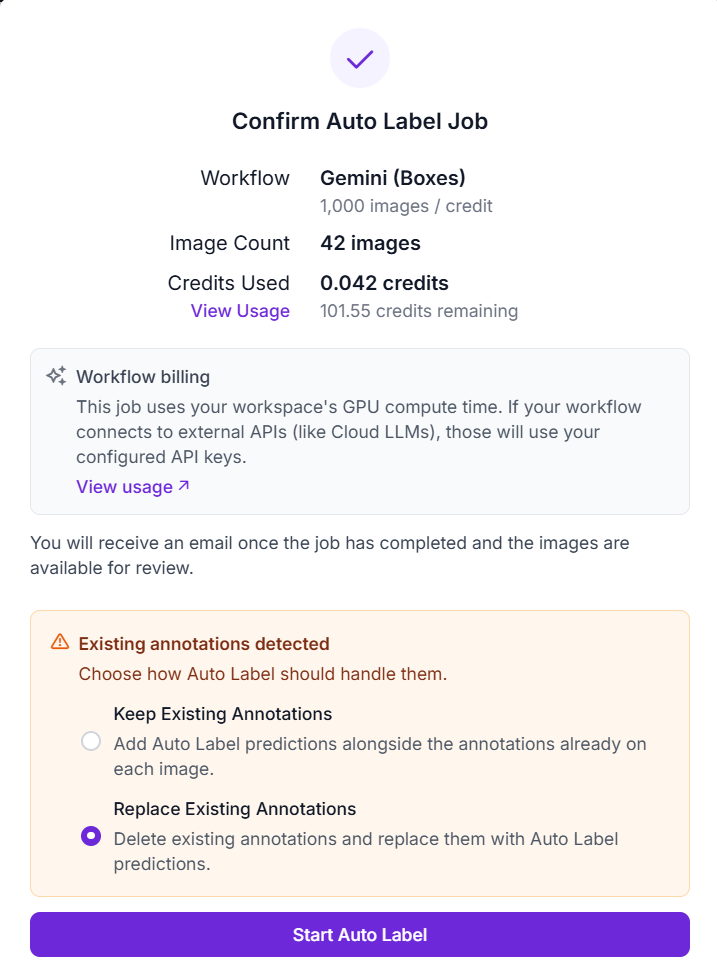
A confirmation appears before the job starts, showing the model, image count, and credit cost. Here, labeling 42 images costs 0.042 credits because Auto Label processes 1,000 images per credit.
You also need to choose how to handle existing annotations. Keep Existing Annotations adds Gemini's boxes on top of any labels already there, while Replace Existing Annotations clears those first. Replace is the safer choice because it leaves the batch with only Gemini's labels and nothing left over. Click Start Auto Label to run the job.
The job runs in the background, and Roboflow emails you when it finishes. Once it is done, the images have their labels and the batch moves to the Review column.
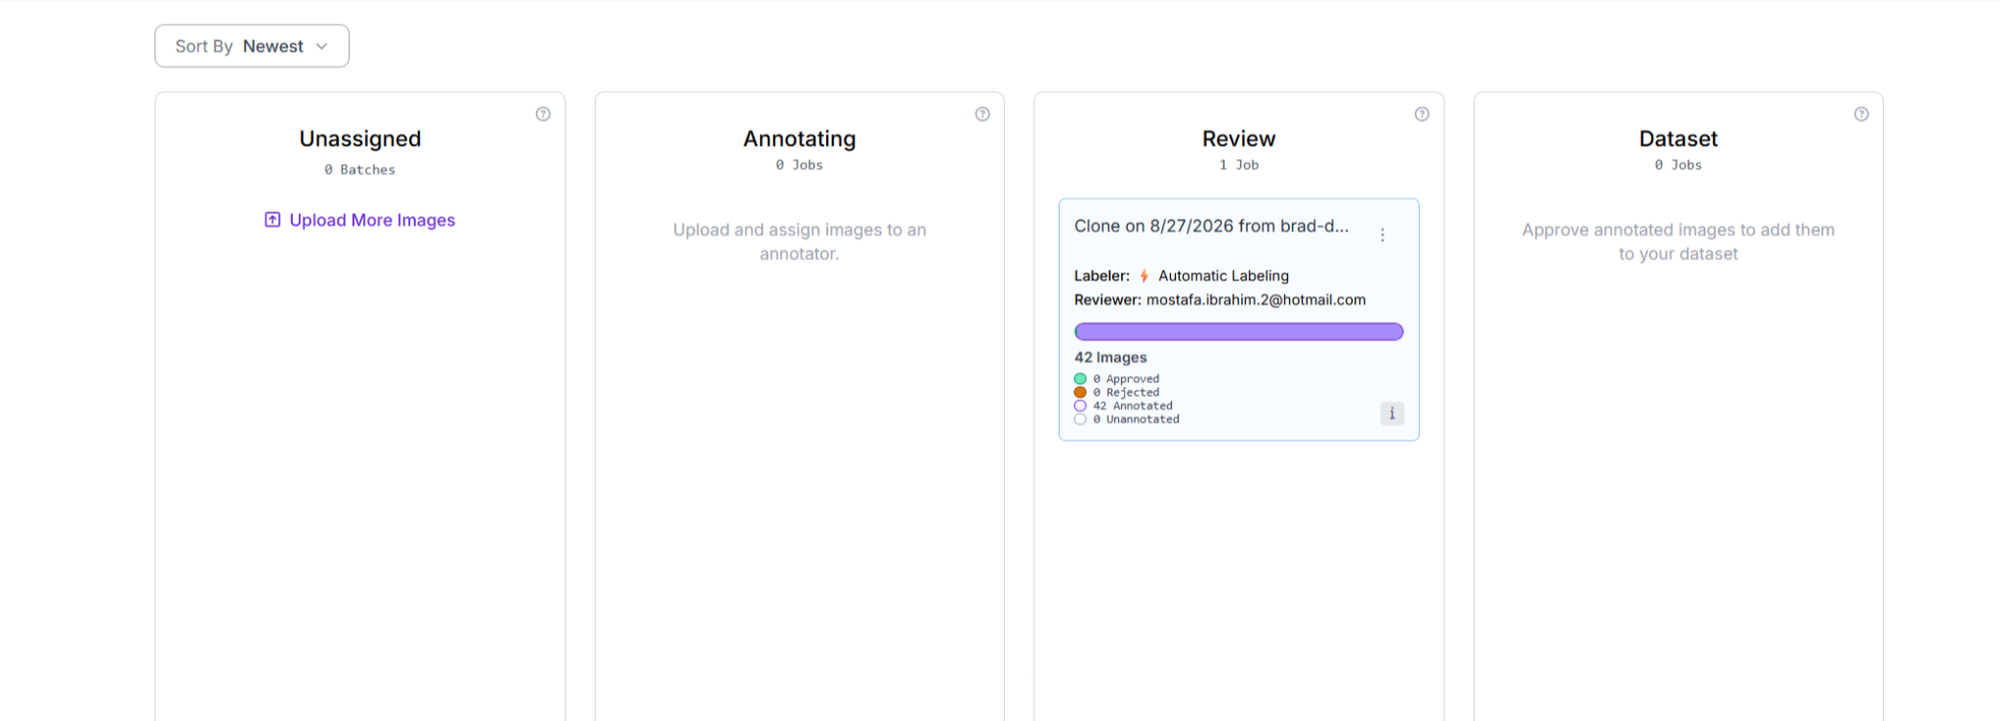
From here, review the labels and fix anything Gemini got wrong.
Step 8: Review and fix the labels
Open the batch from the Review column. Roboflow shows each image with Gemini’s boxes and Reject or Approve at the top.
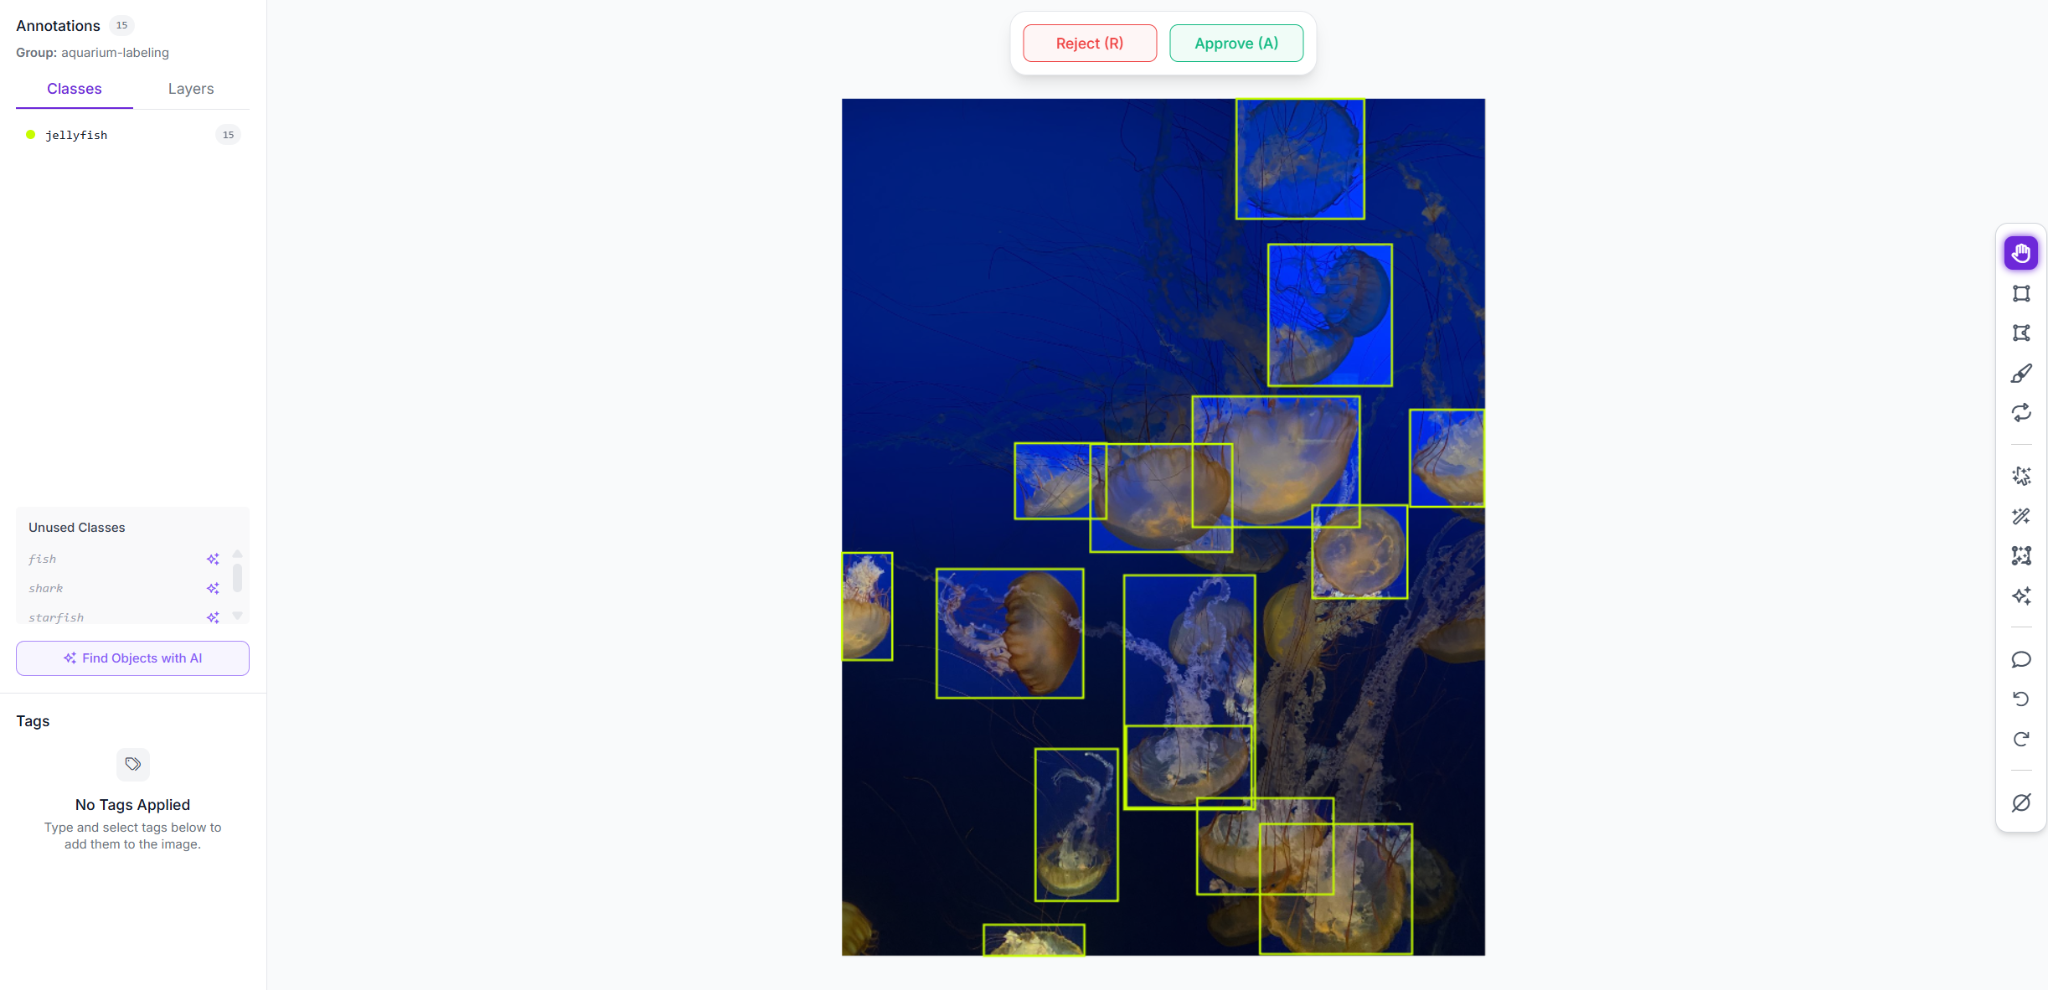
In this crowded image, Gemini boxed 15 jellyfish on its own, saving most of the manual work. It missed a few near the bottom, and some boxes are a little loose. That is the trade-off with automatic labeling: it handles most of the work, but crowded scenes can still leave missed objects or boxes that need adjusting.
Roboflow's annotation tools on the right are useful for cleaning these up. Use the bounding box tool to add the jellyfish Gemini missed, drag the handles to tighten loose boxes, and if Gemini assigns the wrong class, change it from the class list instead of deleting the box. Once the missed jellyfish are added, the image has a complete set of boxes.
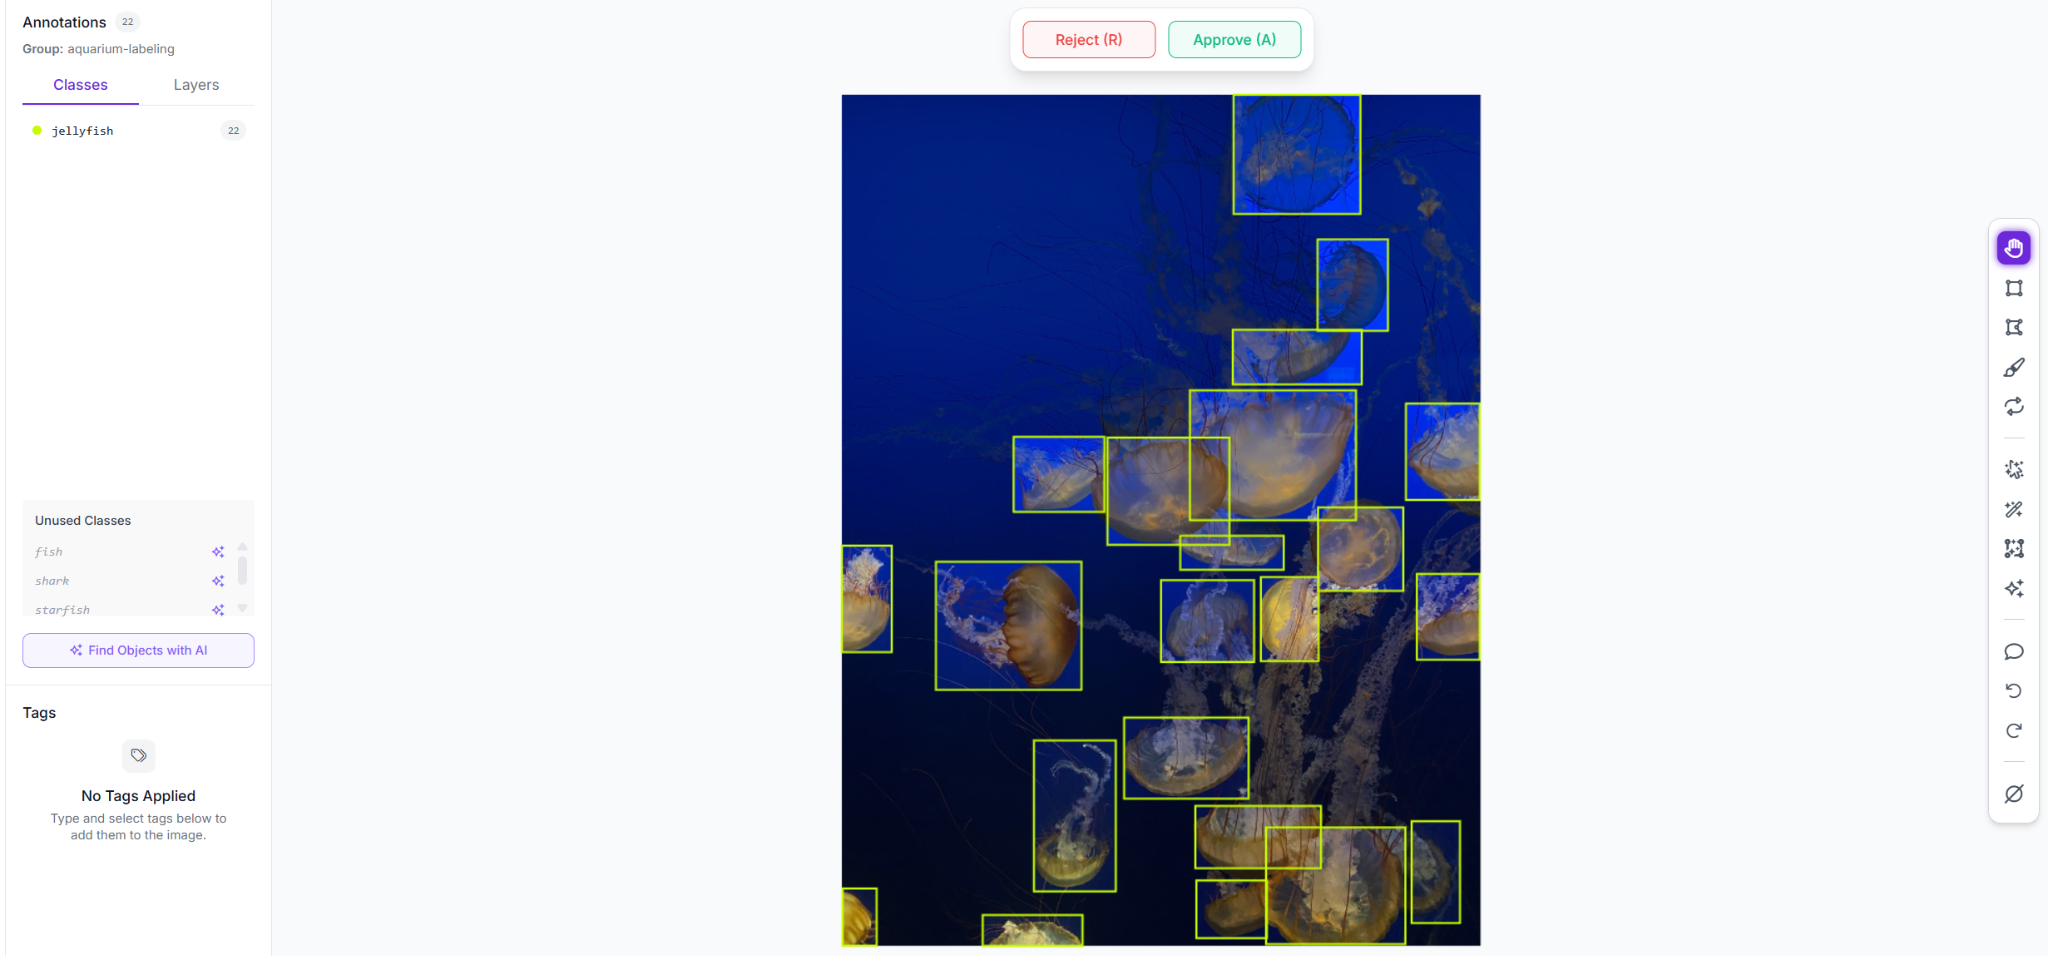
When the image looks right, press Approve (A). If it needs more work, press Reject (R) to send it back for another pass. This review step is where quality is set: you add anything Gemini missed, tighten loose boxes, and fix any wrong classes before the labels enter your dataset. It matters because Gemini gives every box full confidence, so nothing is filtered out for you.
Step 9: Add the labeled images to your dataset
After checking an image and making any needed corrections, click Approve. Continue through the batch, reviewing each image and fixing anything Gemini missed before approving it. You can also use the Approve All button to accept the remaining images at once. Approved images appear in the Approved tab.
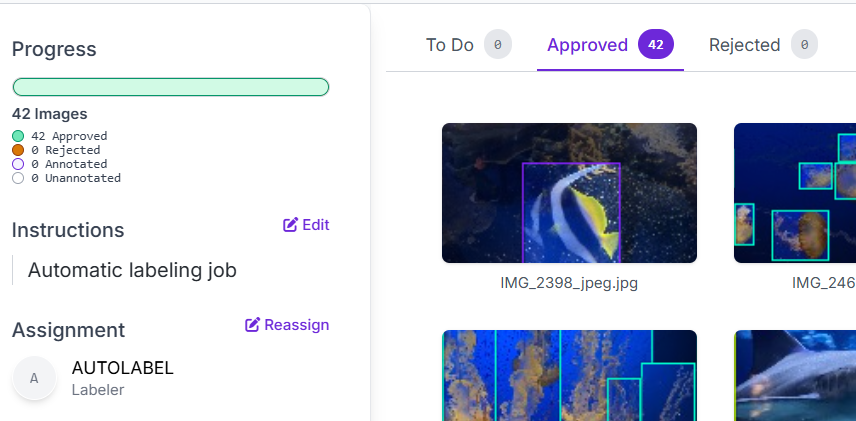
When every image is approved, the batch is fully labeled: 42 images, each with reviewed boxes, built from class names and a quick review pass instead of drawing every box by hand. From here the dataset is ready to version, train, or export.
Gemini vs SAM 3: Which to Reach For
Auto Label gives you two foundation models, each suited to a different type of labeling task. Use Gemini (Boxes) when you are working with common objects that are easy to describe by name and you only need bounding boxes. As you saw in the preview, it uses the class names to identify objects and tell similar ones apart, which makes it a good choice for straightforward object detection without precise outlines.
Use SAM 3 when the shape of the object matters and a bounding box is not enough. This makes it more useful for tasks such as defect analysis or medical imaging where the outline needs to be precise. SAM 3 also uses the description field that Gemini ignores, so you can give it more context when a class name alone is not enough.
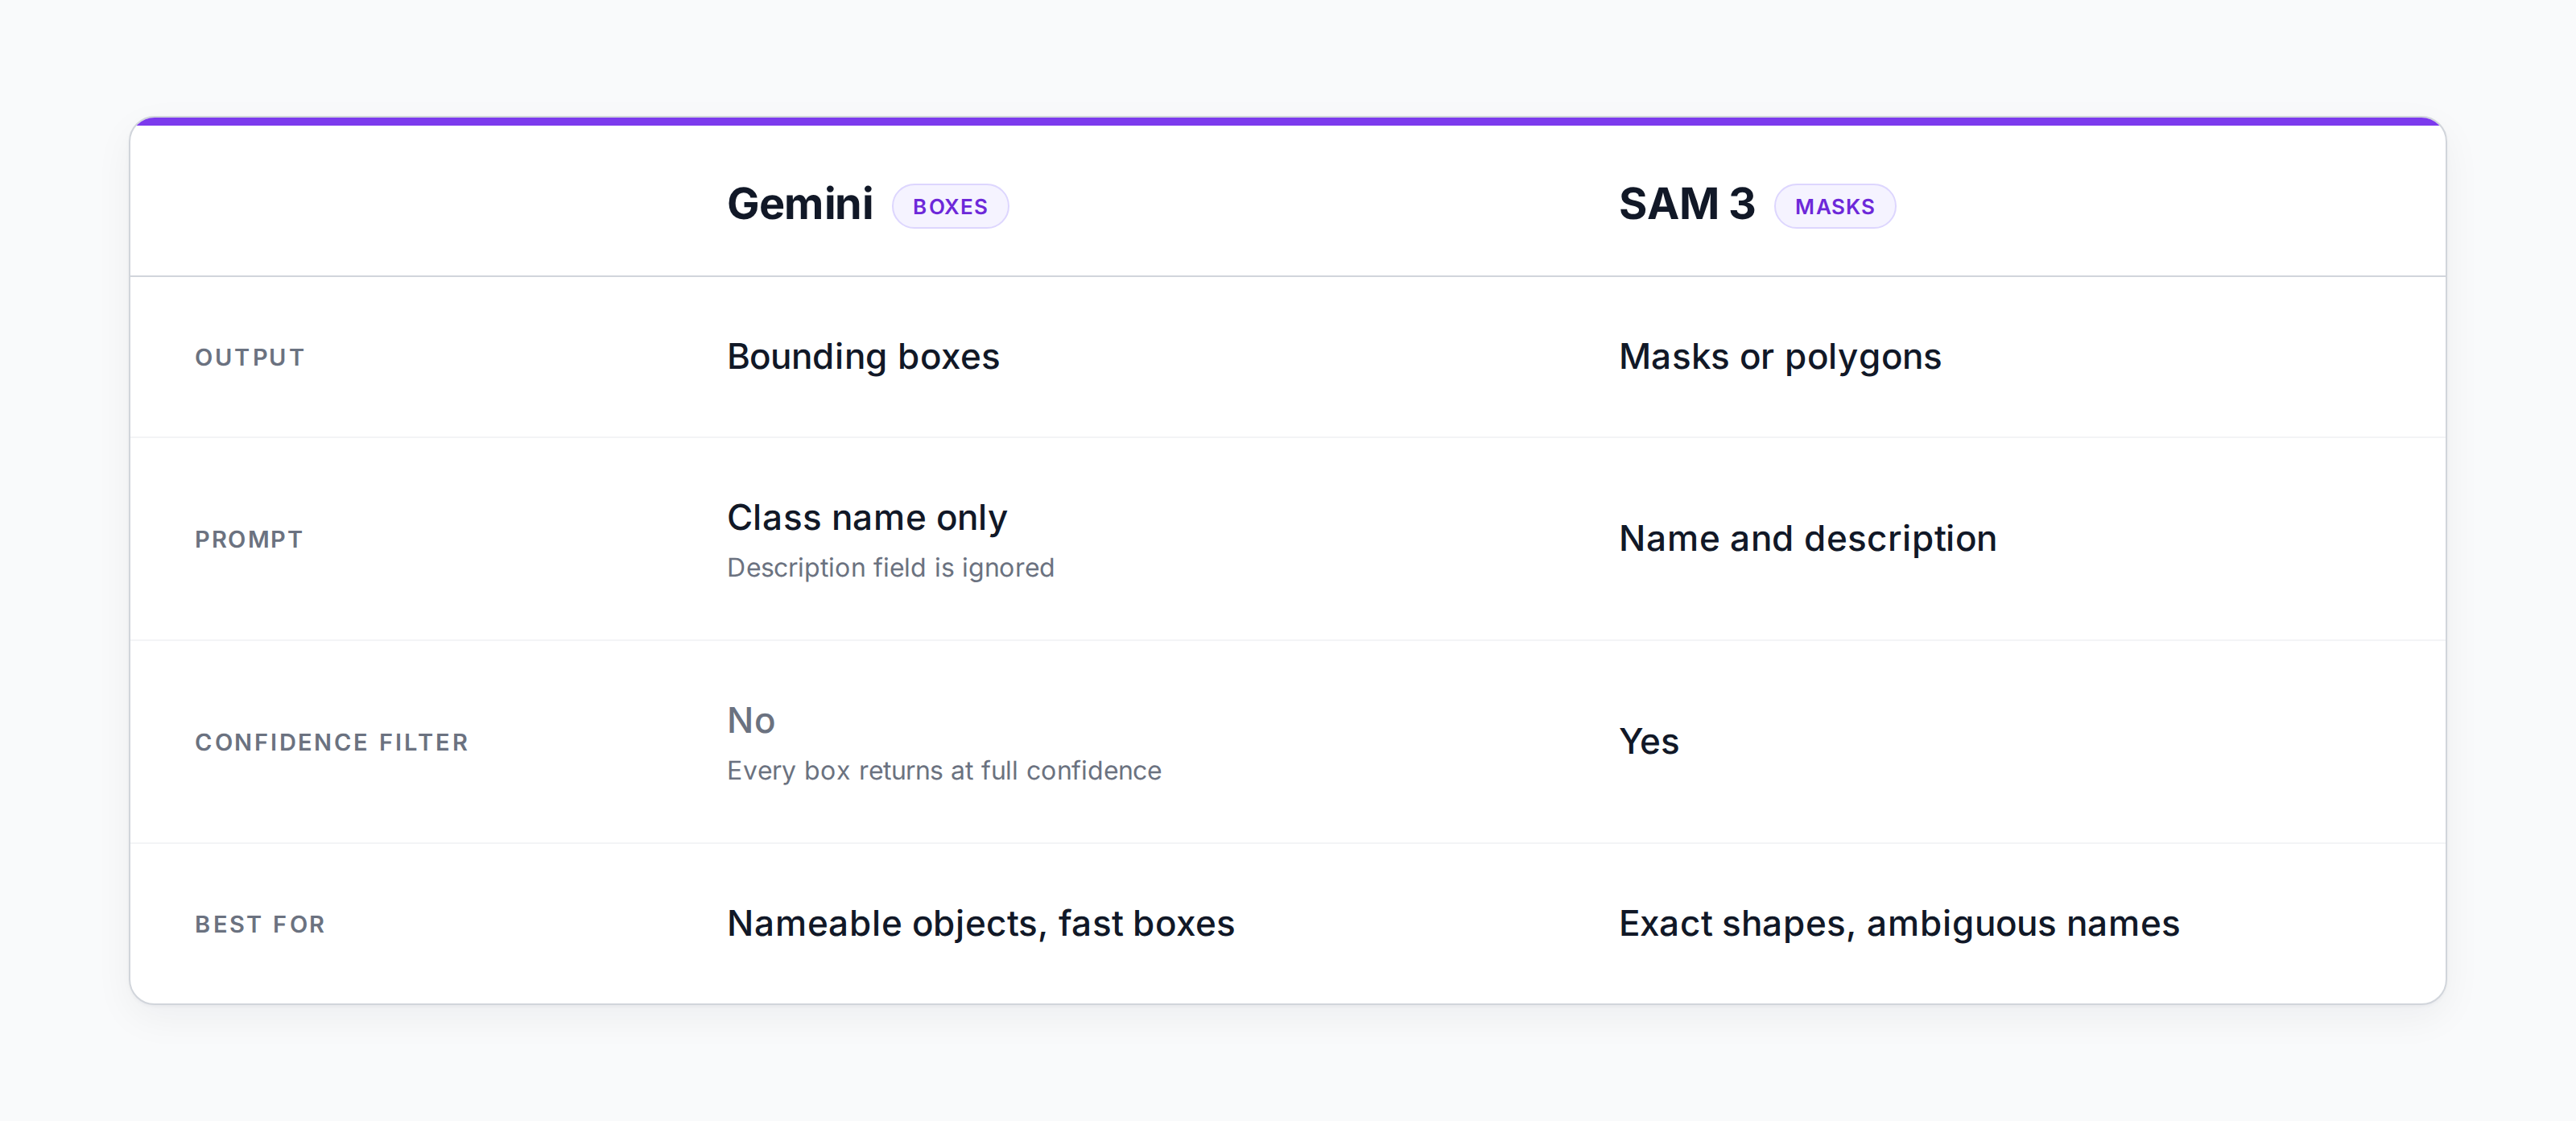
You can also use both models together. Use Gemini for the easy-to-name classes, then switch to SAM 3 when you need a more precise outline. Either way, review the labels before training. Both models can speed up the work, but neither gets every annotation right.
Next Steps
Your reviewed labels are ready to use, so in Roboflow, go to the Versions tab and generate a dataset version to lock in the images and annotations, then train a detector such as RF-DETR directly in the platform and deploy it to process new images, live video, or a camera stream. As the dataset grows, you can run Gemini on larger batches, add new classes when you need to detect different objects, or send low-confidence predictions from a trained model back into Auto Label so you can focus on the cases the model struggles with. You can also combine Gemini with other models in a Workflow and use their outputs to filter or check annotations before adding them to the dataset.
Conclusion
This tool is currently available within paid Roboflow plans. Labeling an object detection dataset can take a lot of time when every box has to be drawn by hand. Gemini 3.7 Flash in Auto Label does much of that work for you. You give it the class names, it adds the boxes, and you check the results and fix anything it gets wrong. That makes it easier to work with larger datasets and more classes without spending hours drawing boxes yourself.
Further reading

 点赞
点赞 收藏
收藏 点踩
点踩 分享
分享