How to Build a Parking Lot Monitoring System with Computer Vision

SUMMARY
You can build a parking lot monitoring system with Roboflow. Train RF-DETR to classify each space as empty or occupied, and connect it to a Workflow. The Workflow counts both classes with a short Python block and overlays live empty and occupied totals on your parking lot video, frame by frame.
Imagine managing a busy parking lot and trying to keep track of how many spaces are still available. As the number of vehicles changes throughout the day, manually monitoring which spaces are occupied can quickly become difficult, especially in larger parking lots.
Computer vision can help automate this process. By analyzing footage from a parking lot camera, a computer vision system can identify whether individual parking spaces are empty or occupied and use these predictions to monitor the lot's current availability.
In this tutorial, we will build a parking lot monitoring system using Roboflow. We will prepare a dataset containing empty and occupied parking spaces, train an object detection model, and build a Workflow that detects and counts the number of available and occupied spaces. By the end, we will have a system that can analyze parking lot video footage and provide a real-time summary of its current occupancy.
Building the Parking Lot Monitoring System
Step 1: Set Up Your Roboflow Project
To get started, sign in to your Roboflow account. If you don't already have an account, you can create one for free.

Step 2: Prepare the Parking Lot Monitoring Dataset
Training a parking-space detection model from scratch would require collecting and annotating a large number of parking lot images. Instead, we will use an existing dataset from Roboflow Universe as the starting point for this project.
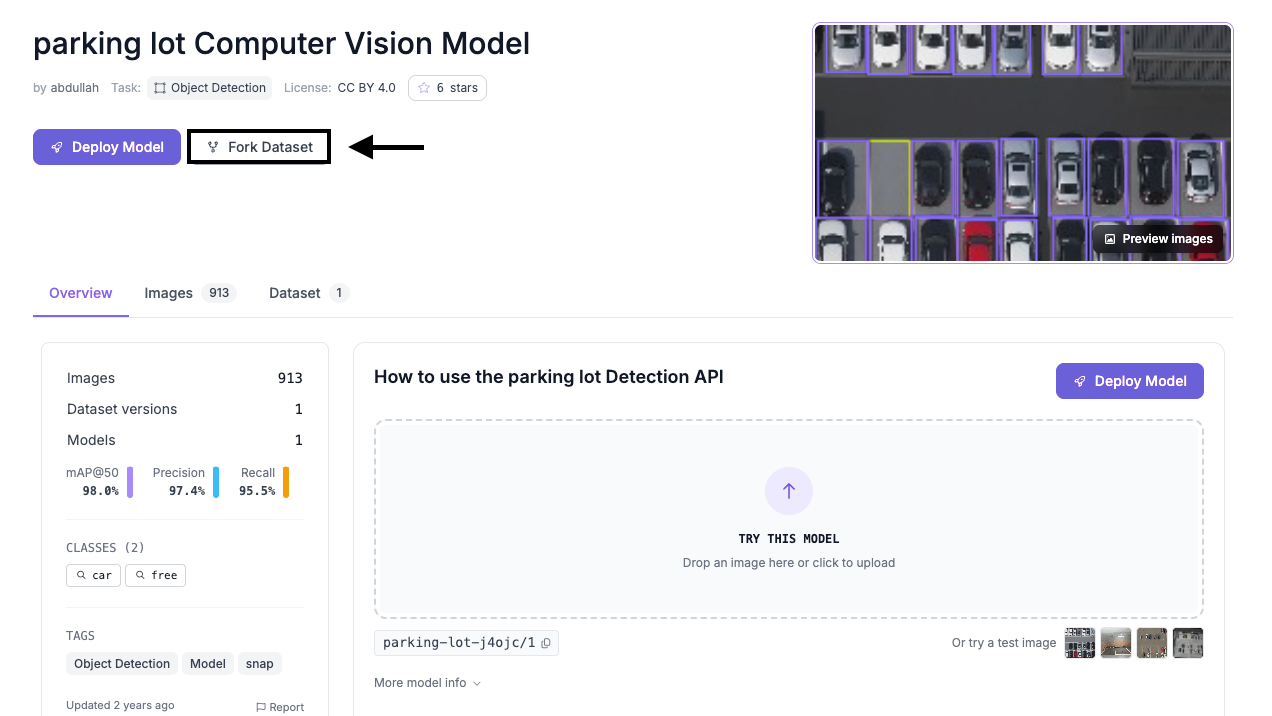
The Parking Lot dataset contains images of parking lots with annotations identifying available and occupied spaces. The original dataset uses two classes, car and free.
Since the original class names are somewhat vague for this use case, I renamed them after forking the dataset into my workspace:
car→occupiedfree→empty
These names more clearly describe what we want the model to identify: whether a parking space is currently occupied or empty.
To use the dataset, open it in Roboflow Universe and click Fork Dataset. Select your workspace as the destination and complete the fork. This creates a copy of the dataset that you can modify and use to generate your own dataset version.
Step 3: Train the Parking Lot Monitoring Model
With the dataset ready, open the project in your Roboflow workspace and select Train. Choose Custom Training and select RF-DETR as the model architecture.
For this project, we will use the Small RF-DETR model. The model will learn to locate parking spaces in an image and classify each detected space as either empty or occupied.
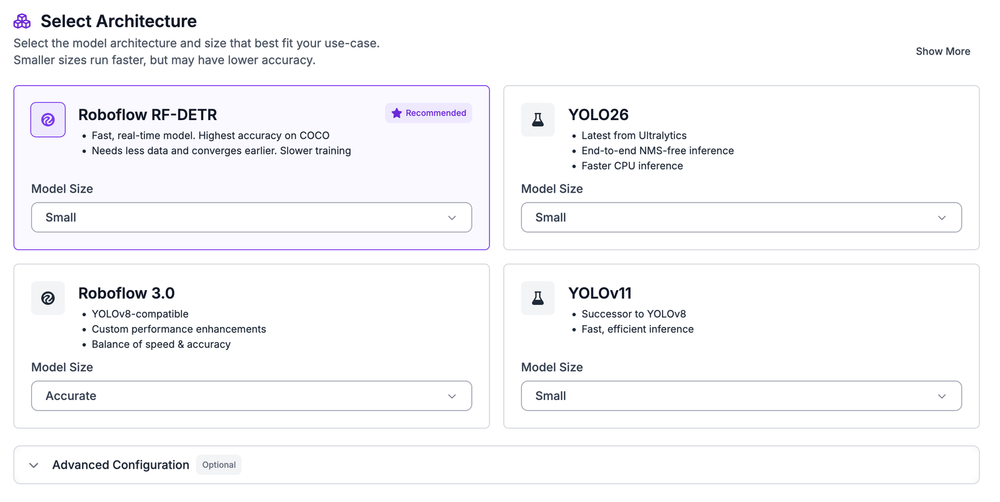
Before starting the training process, Roboflow will prompt you to select the dataset version that will be used for training. This is where we can configure the dataset split, preprocessing, and augmentation settings.
Step 4: Split the Dataset for Training and Testing
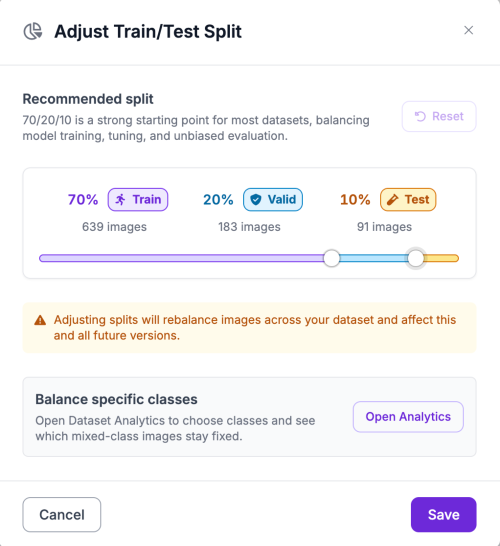
We need to reserve some of the images for evaluating the model after training rather than allowing the model to learn from every image.
The training set is used to teach the model how parking spaces appear in different conditions. The validation set is used during training to monitor how the model performs on images it is not directly learning from. Finally, the test set is kept separate so we can evaluate the completed model on previously unseen images.
For this project, use the following split:
- 70% training
- 20% validation
- 10% testing
When creating the dataset version, check the split percentages and adjust them if necessary before continuing.
Step 5: Configure Preprocessing and Augmentations
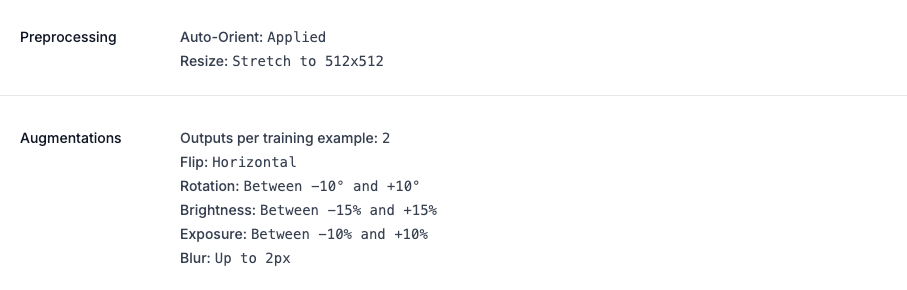
Before training the model, we can use Roboflow's preprocessing and augmentation tools to prepare the images and introduce some variation into the dataset. This can help the model handle differences in image orientation, lighting, and camera conditions.
For preprocessing, I applied the following:
- Auto-Orient: Automatically corrects the orientation of each image using its stored metadata.
- Resize: Stretches each image to 512 × 512 pixels so that all images have a consistent input size.
For augmentation, I set Outputs per training example to 2 and applied the following transformations:
- Horizontal Flip: Flips the image horizontally to provide the model with additional views of the same parking spaces.
- Rotation: Between -10° and +10° to account for small differences in camera angle.
- Brightness: Between -15% and +15% to simulate changes in lighting conditions.
- Exposure: Between -10% and +10% to help the model handle brighter or darker images.
- Blur: Up to 2px to introduce slight variations in image sharpness.
These augmentations provide the model with additional variations of the parking lot images while keeping the scenes realistic. For this project, I kept the augmentations relatively limited since the parking spaces and their layout need to remain recognizable.
Another augmentation that could be useful for this type of dataset is 90° rotation, particularly if the model needs to work with parking lots captured from different orientations. I did not include it in this training run, but it could be worth testing in a future version of the dataset.
Once the settings are configured, click Start Training to begin training the model.
Step 6: Evaluate the Model
Once training is complete, Roboflow displays the model's peak performance on the validation set, showing how well it generalizes to parking lot images it did not see during training.
The model achieved the following results:
| Metric | Score |
|---|---|
| mAP@50 | 97.4% |
| Precision | 96.1% |
| Recall | 95.2% |
| F1 | 95.6% |
The model achieved an mAP@50 of 97.4%, indicating that it was highly effective at locating and correctly classifying parking spaces as either empty or occupied at the IoU threshold used for this metric.
The 96.1% precision means that most of the parking-space predictions made by the model were correct. A 95.2% recall indicates that the model detected the large majority of the parking spaces present in the images, with relatively few being missed.
Finally, the model achieved an F1 score of 95.6%, which provides a balance between precision and recall. The high F1 score suggests that the model was able to identify parking spaces consistently while keeping incorrect predictions relatively low.
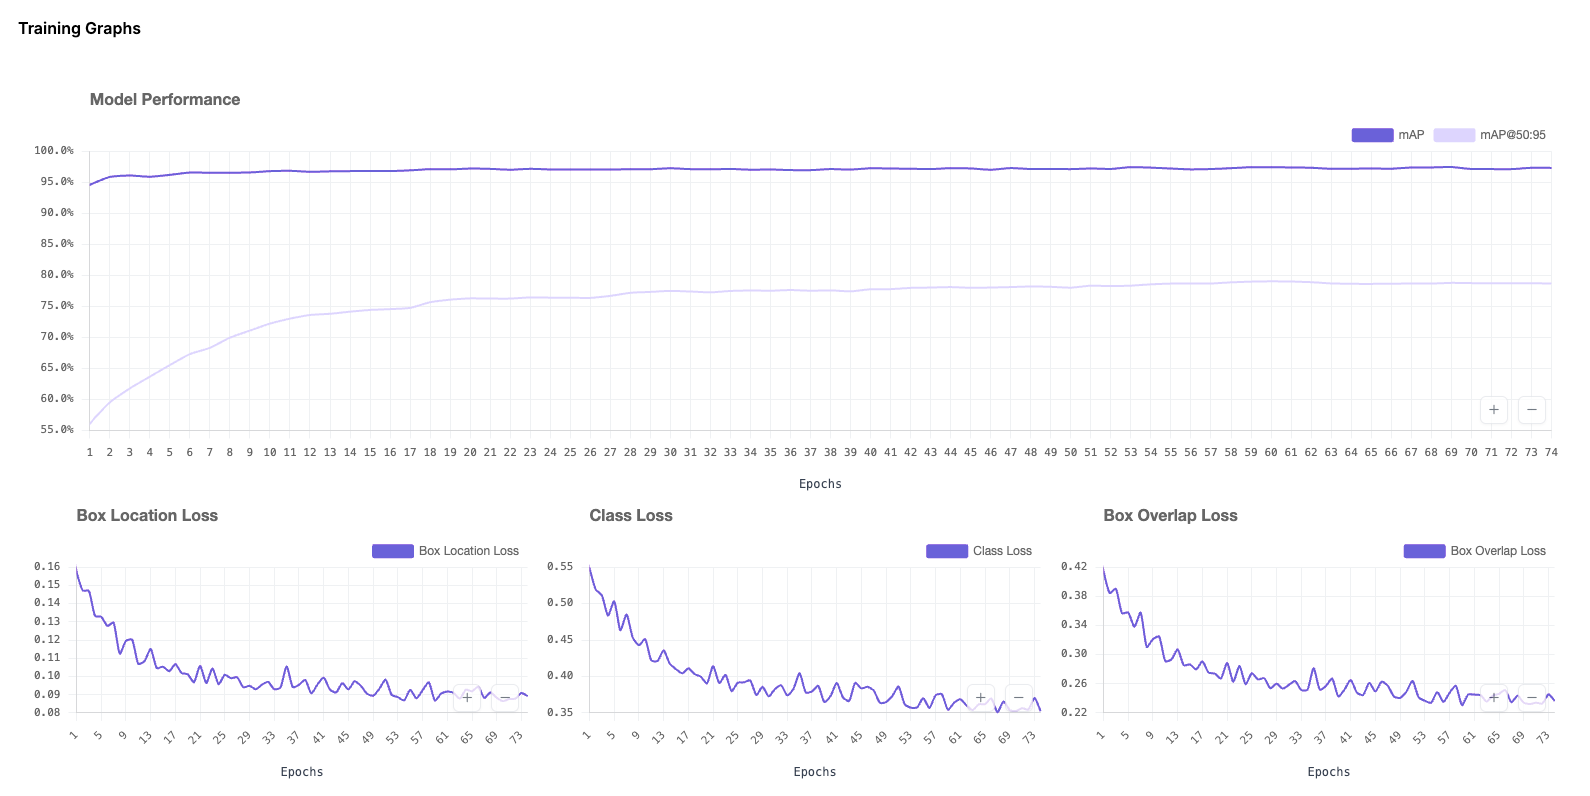
These results provide a strong starting point for the parking lot monitoring system. However, model performance should also be evaluated on real-world video footage, since factors such as camera angle, lighting, image quality, and parking lot layout can differ from the images in the test set. Testing the model on footage from a different parking lot can help determine how well it generalizes beyond the original dataset.
Step 7: Build the Parking Lot Monitoring Workflow
Now that we have a trained model, we can use a Roboflow Workflow to turn its predictions into a parking lot monitoring system. The Workflow will process a video frame by frame, identify which parking spaces are empty or occupied, and then keep track of the current occupancy count.
To create the Workflow, open the Workflows tab in your Roboflow dashboard and select Create Workflow. Choose a blank Workflow. The Input and Output blocks will already be included.
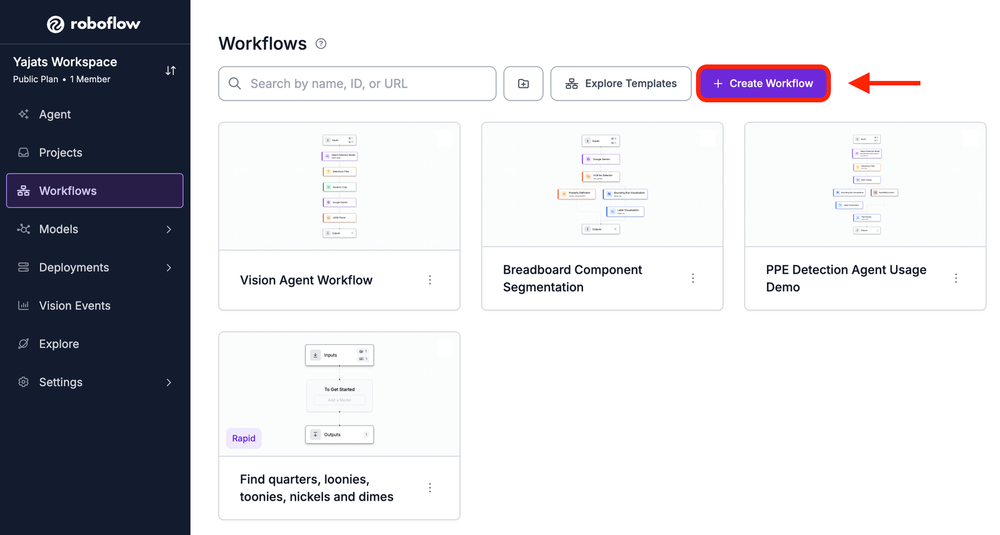
For this project, the Workflow splits into two branches after the Object Detection Model block:
- Visualization branch: Bounding Box Visualization → Label Visualization
- Counting branch: Custom Python Block
The two branches then come back together at a Text Display block, which overlays the current number of empty and occupied spaces on the video before sending the final result to the Output block.
Block 1: Object Detection Model
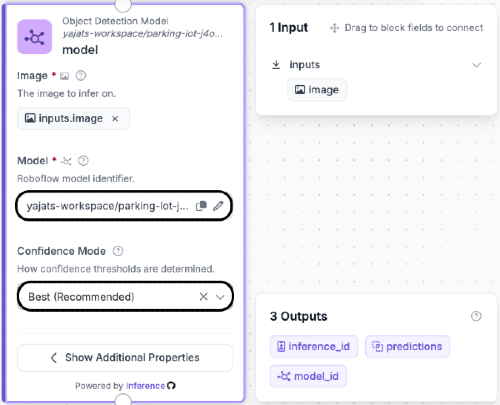
The first block we need is the Object Detection Model block. This is where our trained RF-DETR model analyzes each frame and determines whether the visible parking spaces are empty or occupied.
Click Add Block and search for Object Detection Model. Connect the Image input to the image provided by the Workflow's Input block, then select the parking-space model we trained earlier.
The model will output an object_detection_prediction containing information about each detected parking space, including its bounding box, class name, and confidence score. These predictions will then be sent down both branches of the Workflow.
Building the Visualization Branch
The first branch of our Workflow is responsible for making the model's predictions visible on the video. It uses two blocks: Bounding Box Visualization and Label Visualization. The first draws a box around each detected parking space, while the second adds the corresponding empty or occupied label.
Block 2: Bounding Box Visualization
We'll first create the visualization branch so that we can see where the model is detecting parking spaces.
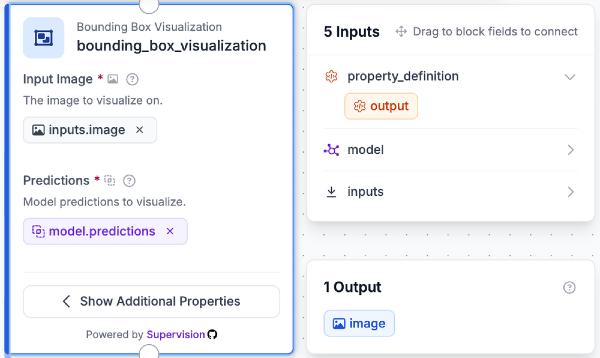
Add a Bounding Box Visualization block and connect it to the Object Detection Model block. Configure the block with:
- Image: The original image from the Input block
- Predictions: The predictions from the Object Detection Model
The block uses the coordinates from the model's predictions to draw a bounding box around each detected parking space. This allows us to see which areas of the parking lot the model is identifying.
Block 3: Label Visualization
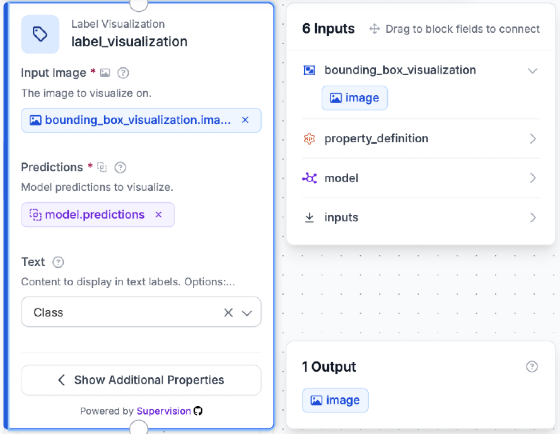
Next, add a Label Visualization block to show whether each detected parking space is empty or occupied.
Connect the Label Visualization block after the Bounding Box Visualization block and configure it with:
- Image: The output from Bounding Box Visualization
- Predictions: The predictions from the Object Detection Model
- Text: Set this to Class so it displays the predicted class name.
The resulting image will show each parking space with a label such as empty or occupied.
This gives us a visual representation of the model's predictions while the video is running, making it easy to see when a parking space changes from one state to another.
Building the Counting Branch
While the visualization branch shows us which parking spaces are empty or occupied, we also want to know the total number of spaces in each state. We can calculate these values with a Custom Python block.
Block 4: Count Empty and Occupied Spaces with Python
The visualization branch shows us what the model sees, but we also need a way to turn those predictions into a running parking-space count. This is where the Custom Python Block comes in.
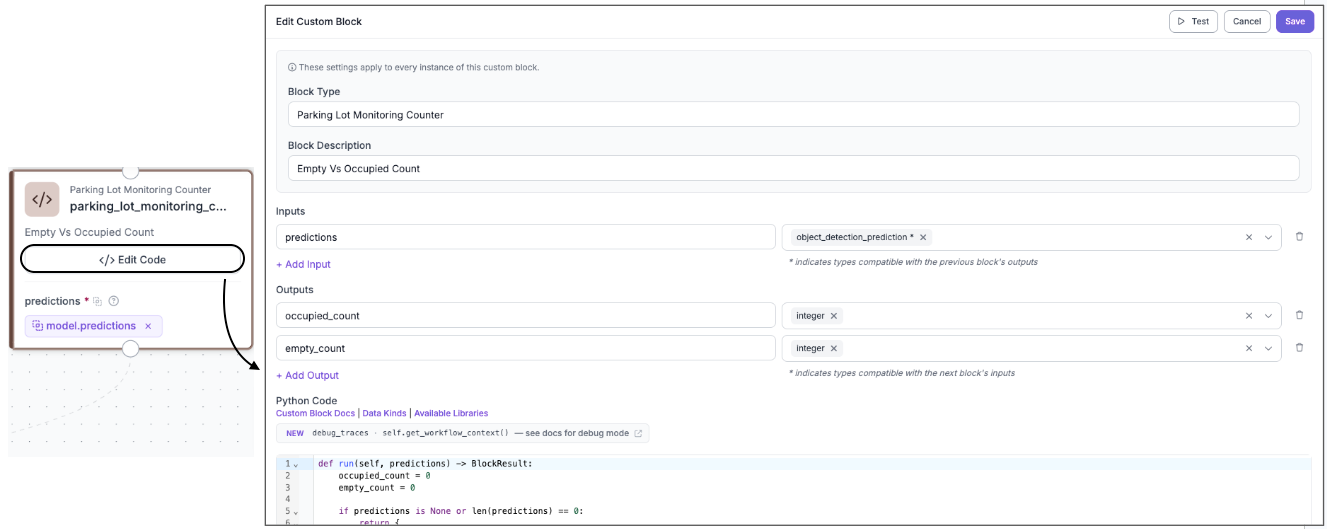
Add a Custom Python Block and configure it with one input and two outputs.
Under Inputs, add predictions as type object_detection_prediction and connect it to the predictions output from the Object Detection Model.
Under Outputs, add:
occupied_countas typeintegerempty_countas typeinteger
These outputs will contain the number of occupied and empty parking spaces detected in the current frame.
Click Edit Code and add the following:
def run(self, predictions) -> BlockResult:
    occupied_count = 0
    empty_count = 0

    if predictions is None or len(predictions) == 0:
        return {
            "occupied_count": 0,
            "empty_count": 0,
        }

    class_names = list(predictions.data.get("class_name", []))

    for class_name in class_names:
        cls = str(class_name).strip().lower()

        if cls == "empty":
            empty_count += 1
        elif cls == "occupied":
            occupied_count += 1

    return {
        "occupied_count": int(occupied_count),
        "empty_count": int(empty_count),
    }
The code starts both counters at zero and then goes through every prediction produced by the model. If the prediction is classified as empty, the empty_count increases by one. If it is classified as occupied, the occupied_count increases by one.
For example, if the model detects three empty spaces and five occupied spaces in a frame, the block will return:
empty_count = 3
occupied_count = 5
The block performs this calculation for each frame, so the values can change as cars enter and leave the parking spaces.
If no predictions are returned for a frame, the block simply outputs zero for both counts rather than attempting to process an empty set of detections.
Block 5: Display the Occupancy Count
Now that the visualization and counting branches are producing their respective outputs, we can bring them together with a Text Display block. This block will overlay the current number of empty and occupied parking spaces directly onto the video.
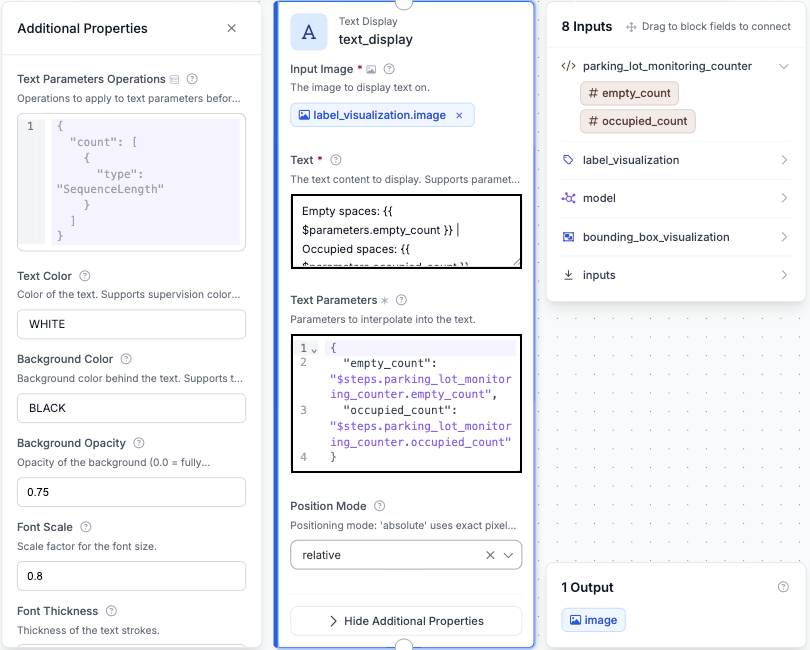
Add a Text Display block and connect its Image input to the output of the Label Visualization block. This allows the final output to retain the bounding boxes and labels showing the state of each parking space.
In the Text field, enter:
Empty spaces: {{ $parameters.empty_count }} | Occupied spaces: {{ $parameters.occupied_count }}
Under Text Parameters, map the parameters as follows:
{
  "empty_count": "$steps.parking_lot_monitoring_counter.empty_count",
  "occupied_count": "$steps.parking_lot_monitoring_counter.occupied_count"
}
The empty_count and occupied_count values are taken directly from the parking_lot_monitoring_counter block. Since the Python block recalculates these values for every frame, the text overlay will update as the parking lot changes.
This gives us a simple way to see the overall parking availability while still viewing the individual parking-space predictions.
Step 8: Test the Workflow
With the Workflow complete, we can test it on a parking lot video to see how it performs on real footage.
In the Workflow editor, click Test in the upper-right corner and upload a video showing cars entering and leaving parking spaces. Roboflow will process the video frame by frame and display the detected parking spaces along with the current empty and occupied counts.
As cars enter or leave a space, the model should update its prediction and the counts should change accordingly. Try testing the Workflow with different videos and lighting conditions to see how consistently the model performs.
If you notice missed detections or incorrect predictions, you can adjust the confidence threshold or add more representative images to the dataset and retrain the model.
You can try the complete parking lot monitoring Workflow here.
Parking Lot Monitoring System Conclusion
In this tutorial, we built a computer vision system that can automatically determine which parking spaces are empty or occupied and keep track of the total occupancy of a parking lot. We trained an RF-DETR model on parking-space images and connected it to a Roboflow Workflow that visualizes each prediction and updates the counts as cars enter and leave.
While this is a relatively simple demonstration, the same approach can be used as a starting point for more advanced parking management systems. With a larger and more diverse dataset and a live camera feed, the system could be adapted to monitor parking availability in real-world environments.

 点赞
点赞 收藏
收藏 点踩
点踩 分享
分享