
Debug Past an HTTP 403 Without Breaking Spring Security
'%20fill-opacity='.8'%20d='M3.256%203.913a3.083%203.083%200%200%200-.003%204.397L8%2012.998l4.743-4.684a3.085%203.085%200%200%200%20.001-4.4c-.6-.593-1.4-.914-2.233-.914a3.17%203.17%200%200%200-1.91.635L8%204.087l-.601-.452A3.17%203.17%200%200%200%205.489%203c-.834%200-1.634.321-2.233.913m10.19%205.111-4.748%204.69a.996.996%200%200%201-1.397%200L2.549%209.02a4.083%204.083%200%200%201%20.004-5.82A4.17%204.17%200%200%201%205.488%202c.907%200%201.787.29%202.512.835A4.17%204.17%200%200%201%2010.51%202c1.093%200%202.146.422%202.936%201.202a4.085%204.085%200%200%201%200%205.822'%20/%3e%3c/svg%3e)
'%20stroke-opacity='.75'%20stroke-width='1.5'%20stroke-linejoin='round'/%3e%3c/svg%3e)

You set a breakpoint inside a Spring MVC controller, or a service, send the request to an HTTP endpoint, and nothing happens. The response is back – and it is a 403 (or 401, or a redirect to a login page).
At that point, the bug you were trying to catch is no longer the only problem. Now, you need to answer different questions:
- Which roles or authorities does the endpoint require?
- Should I just disable the security temporarily to debug the logic behind it, maybe?
Security inlays in IntelliJ IDEA are designed for that moment. Instead of updating SecurityConfig temporarily and restarting the app, or fiddling with the authentication in the HTTP test tool, you can inspect and adjust the runtime security right inside the IDE.
See What the Endpoint Requires
When a secured endpoint blocks a request, the first question is “which roles does the running app require right now for this endpoint?”
The inlay displays the role-based requirement for an endpoint – the hasRole / hasAuthority-shaped matchers that most HTTP authorization is built from. However, not every security rule can be displayed with a roles list. For example, rules defined in code in a custom AuthorizationManager show up as unknown – a single lock icon, without roles.
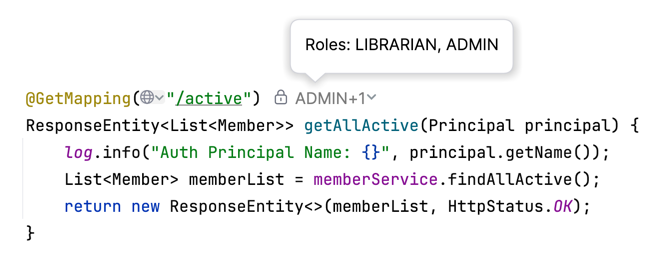
Seeing the actual endpoint security state is important in real Spring applications. Authorization can depend on multiple SecurityFilterChain beans, matcher order, active profiles, and conditionally registered configurations. Reading SecurityConfig classes you can find is not always the same as knowing what the running application requires.
If the roles list isn’t what you expected to see, you still need to read SecurityConfig classes anyway. So, the inlay provides a config link to the real security configuration code behind the endpoint.
Unlock the Endpoint for the Current Debug Session
When you figure out which roles the endpoint requires, the next question is: “Should I skip endpoint authorization, or resend the request with a specific authority set?” Both options are available within the unlock action in the inlay popup.
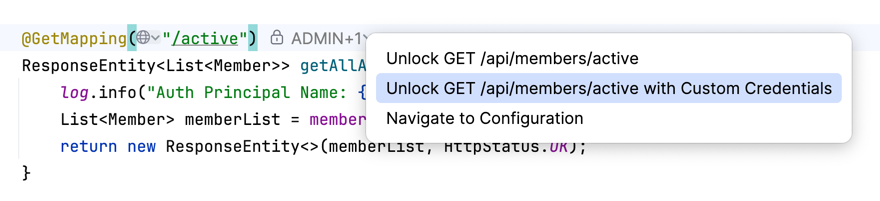
Read this before you click Unlock. Unlock acts on the running process itself, not just on requests sent from the IDE. Any client hitting that exact URI and method is affected: curl, Postman, a browser, etc. If the debugged app is reachable on your network, any request to that exact URI and method is treated as authenticated with the authorities you granted – for anyone. Unlock endpoints carefully, and re-lock or restart when you are done.
Since unlocking is a security-affecting action, it is worth mentioning what it opens and for how long:
- Scope – applies to the exact request URI and HTTP method. The concrete URI comes from the request you’re working with when you unlock – the failing request in your
.httpfile, browser, or curl command. UnlockingGET /admin/users/42in the IDEA HTTP Client leavesPOST /admin/users/42andGET /admin/users/99blocked. Unlocking@GetMapping("/admin/users/{id}")in the controller code will unlock the endpoint for any{id}value. - Layer – covers HTTP endpoint authorization only; method-level checks such as
@PreAuthorizeare evaluated separately (see “What Unlock Does Not Cover” below). - Lifetime – lasts only for the running debug session, or until you lock the path again. Restarting the app clears every unlock. Both a full JVM restart and a Spring Boot DevTools in-process restart work. The unlocked paths and their authority sets live on the session and go with it.
- Persists – nothing in the app. The only thing kept is IDE-local: the username you last impersonated, per endpoint, to pre-fill on re-unlock.
So, depending on your tasks, you can do the following using the security indicator inlay:
Simple Unlock
Sometimes security is not what you are testing. You already know the endpoint is protected, but you need to reach the logic behind it. Unlocking treats the request as authenticated with the full set of roles that the endpoint requires, for that URI and method. Spring Security just sees an identity that passes and you can continue the debugging task you were doing. This is the right mode when the real tasks are:
- validate request or mapping logic in the controller;
- debug a service behind a protected route;
- a smoke test that is blocked by a local authentication setup;
- a bug reproduction you do not want to interrupt with config edits and restarts.
If the IDE cannot evaluate the roles list for the endpoint, this functionality is not available. For this case, use…
Unlock with custom authorities
The inlay popup menu also allows you to specify a username and a custom role list. Treat this as a way to test a specific authority set. It lets you check authority-based behavior behind the endpoint without creating a real account, changing test data, or going through a full SSO or token flow.
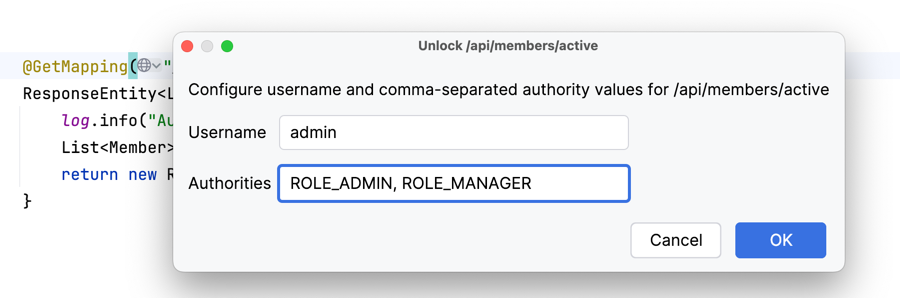
For example, you can enter the username admin with ROLE_ADMIN, ROLE_MANAGER authorities in the popup. Resend the request, and answer questions like:
- Does the controller return the expected data when the request has specified authorities?
- Is the problem in the controller logic, or in the authority set used for the request?
- How does downstream code – branching, data filtering, authority checks – behave for this exact authority set?
- Does the audit engine record a proper username –
admin?
When you perform either of these actions, the request runs with an artificial Authentication in the SecurityContext, created inside the running application by the debugger with the username and roles you chose. Code that reads the authority set – via hasRole / hasAuthority checks, SecurityContextHolder.getContext().getAuthentication(), or a Principal / Authenticationmethod parameter – sees the authorities provided by IntelliJ IDEA.
One thing to watch for: a controller parameter annotated with @AuthenticationPrincipal does not resolve for inlay-unlocked requests – it comes back null. This is a known bug, IDEA-389767, which is open and affects 2026.2 as of this writing – check it for the current status. (See “How Unlocking Works Under the Hood” below for why.)
Compared with the usual local workarounds – a permitAll dev profile, a mock authenticator, a commented-out filter – nothing rebuilds or restarts the app, and nothing stays in configuration code that could accidentally get into a production environment.
How Unlocking Works Under the Hood
Is unlocking a backdoor, or a CSRF bypass? Neither – unlock doesn’t disable or suspend anything. It treats the request as authenticated with the authorities you granted, for that exact URI and method, and lets Spring Security evaluate it from there.
If your app enforces CSRF tokens on state-changing requests, CsrfFilter runs earlier in the chain and still rejects a POST / PUT / DELETE with a missing or invalid token. So, you still need a valid token, or a CSRF-exempt setup, separately.
Unlocking is a debug-time feature. Please note that it’s an internal mechanism, not a public IDE API.
On application startup, the debugger places a hidden, non-suspending breakpoint at Spring Security’s own AuthorizationFilter – the exact spot where Spring decides whether a request is allowed. After Spring application context initialization, the IDE reads the effective HTTP authorization rules. Instead of parsing your source, the debugger reads the live SecurityFilterChain out of the running JVM to figure out what each endpoint requires. That is why the inlay shows the actual list of authorities at the HTTP layer. Clicking Unlock adds the URL, username, and roles to a set the IDE keeps for the debug session. The application code and security config are untouched.
The rest of the work happens per request, without pausing anything. When a request hits an “unlocked” URL, the execution flow passes the non-suspending breakpoint in the AuthorizationFilter. If the URL is in the “unlocked” list, the debugger adds a TestingAuthenticationToken instance to Spring’s SecurityContext. This auth object is already marked as authenticated, with the chosen username as principal and the “unlock” roles as granted authorities. Then the request goes on. Later the authorization engine reads the security context, sees the supplied authenticated principal, and evaluates it normally. For any URL you did not unlock, the breakpoint evaluation returns immediately and normal security applies.
The principal used in the auth object is the plain username String, not your app’s UserDetails or other custom principal type. That’s why a controller parameter annotated with @AuthenticationPrincipal (or any custom principal class) does not resolve for inlay-unlocked requests, as mentioned in the “Unlock the Endpoint for the Current Debug Session” chapter.
You can inject the auth object as a controller method parameter, since the artificial auth object is available through the SecurityContextHolder. So the following code should work fine:
@GetMapping("/active")

    ResponseEntity> getAllActive(Principal principal) {

        log.info("Auth Principal Name: {}", principal.getName());

        //...

    }
Please note that those parameters need to be declared as the base type for TestingAuthenticationToken: Principal or Authentication, not a concrete subtype. A parameter typed as JwtAuthenticationToken, for instance, throws an IllegalStateException at request time instead of resolving, because Spring MVC checks that the real principal – the injected TestingAuthenticationToken – is actually an instance of the declared type. That’s a more visible failure than @AuthenticationPrincipal‘s silent null, though the root cause is the same type mismatch. Code that depends on a concrete principal object type, token subtype, claims, credentials, or session-backed identity may still behave differently or even fail for unlocked endpoints.
Unlock hooks AuthorizationFilter, the filter behind authorizeHttpRequests and the AuthorizationManager API. This API is available since Spring Security 5.x and the non-deprecated path in 6.x. If your configuration still uses the older authorizeRequests / FilterSecurityInterceptor, that filter never runs, so unlock does not apply.
Security inlays are turned on by default, and only work while the Spring Debugger is active. You can turn them off with the spring.debugger.security.enabled flag in IntelliJ’s Registry (open it with Find Action → Registry…). Security inlays also work with a remote JVM, including a shared or staging environment. Please note that there is no log message and no actuator indicator if someone has unlocked an endpoint on the remote application. The only way to check is to look at the inlay in the editor of the attached IDE.
What Unlock Does Not Cover
Unlock works with HTTP endpoint security: rules like SecurityFilterChain URL matching, and requestMatchers() method calls. It only works on the Servlet stack, where the breakpoint is added to Spring Security’s AuthorizationFilter. It means Spring WebFlux is not supported. It uses a different class instead, AuthorizationWebFilter, which unlock does not hook (yet).
Right now, there is also no support for method-security annotations, such as:
@PreAuthorize;@PostAuthorize;@Secured.
There is no inlay for them, no way to see what they require, and no unlock action that targets them directly.
However, the same injected Authentication is what a method security interceptor reads too. If a service method is guarded by @PreAuthorize and the authorities you injected on an unlocked endpoint satisfy it, that check passes.
Let’s have a look at the small example:
@RestController
class UserController {

    @GetMapping("/admin/users/{id}")
    public User getUser(@PathVariable Long id) {
        return userService.findUser(id);
    }
}

@Service
class UserService {

    @PreAuthorize("hasRole('ADMIN')")
    public User findUser(Long id) {
        // ...
    }
}

@Configuration
@EnableMethodSecurity
class SecurityConfig {

    @Bean
    SecurityFilterChain securityFilterChain(HttpSecurity http) throws Exception {
        http.authorizeHttpRequests(authorize -> authorize
                .requestMatchers("/admin/**").hasRole("ADMIN")
                .anyRequest().authenticated());
        return http.build();
    }
}
When you unlock GET /admin/users/{id} as ROLE_ADMIN, the call from UserController into UserService.findUser also passes the @PreAuthorize check – not because unlock targets it directly, but because the method-security interceptor reads the same SecurityContext the breakpoint already populated.
One Unlock, Several Clients
A request can come from several places: an IntelliJ IDEA .http file, a curl script, a Postman collection, or a test suite hitting your locally debugged app. If the request is rejected, don’t spend time switching to another HTTP testing tool.
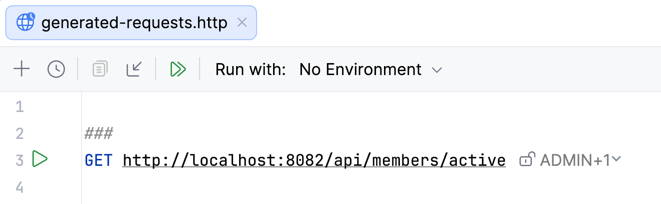
For requests sent from the built-in IntelliJ IDEA HTTP Client, the security inlay sits right near the request URL in an .http file, so you don’t even need to switch to the controller code. For external clients, you’ll need to open the controller code, unlock the endpoint, and re-run the same curl or Postman request.
A Note for Automated and AI Workflows
In IntelliJ IDEA 2026.2, unlock is available in the inlay in the editor or in the .http file – it is a manual, in-IDE action. There is no programmatic switch yet, so an external script or an AI agent cannot use it on its own. We’re planning an MCP tool and a related skill that would let an agent get the roles list and perform lock/unlock actions for a selected endpoint directly, without a human in the loop. That’s aimed at the next release, 2026.3.
Until then, unlock the endpoint once from the IDE to let an agent test it. It stays unlocked for the rest of the debug session, so the agent can keep replaying curl, .http, or test requests with no further clicks. The manual step is a one-time setup, so an agent iterating on downstream controller or service logic can run unattended after it.
Conclusion
Security inlays are designed to simplify your (developer’s) life. They show the real security rules for an endpoint, and let you pass them so you can debug more easily. You can see what the endpoint requires and unlock it if needed. The request is then treated as authenticated with the authorities you choose for the debug session. All of this happens without editing SecurityConfig or restarting the app.
By applying unlock, IDEA makes a temporary security change in the running app. It opens the exact URI and method you unlocked to every client that reaches it. If you unlocked a path pattern in the controller code, it opens all paths that match the pattern.
The path stays open until you lock it again or the debug session ends. Please use it carefully, especially on an app with network access.
A few limitations are worth mentioning:
- Servlet only – Inlays and unlock hook Spring Security’s
AuthorizationFilter. That filter only exists on the Servlet stack, so WebFlux isn’t supported yet. - Debug mode only – This feature requires an active debugger session, local or on a remote JVM.
Principal / Authentication, not a concrete subtype – Declare a controller method parameter asPrincipalorAuthentication. A parameter annotated with@AuthenticationPrincipalcomes backnull. A parameter typed as a concrete subtype, likeJwtAuthenticationToken, throws an error instead, because Spring MVC checks that the injected object matches the declared type.
The inlays are part of the Spring Debugger plugin for IntelliJ IDEA Ultimate, available since the 2026.2 release.